
Sewing/Crafting

I love to sew but sometimes Im not in the mood. I have projects right now I need to finish and just havent quite got there yet. My grandmother and mother sewed all our little dresses when we were little girls. I had a homemade Easter dress every year when I was growing up. I miss those too. I wish I would have kept some of them.

Its quite simple to get started. You just need the right equipment. Start out small. Don’t go out and buy a bunch of stuff right off the bat. Just a simple single needle sewing machine, and maybe you can splurge on a serger. I love the finished look of a serger on side seams. They are very handy and fast. The right kind of scissors can make a huge difference too. You will need dress shears or scissors. These scissors blades are designed to cut fabric better. You’ll need notions like pens, needles, thread, bobbins, etc. Most anything else you might need to make a project will be specified on the back of your pattern.This is my serger and just love it.


Its quite simple to get started. You just need the right equipment. Start out small. Don’t go out and buy a bunch of stuff right off the bat. Just a simple single needle sewing machine, and maybe you can splurge on a serger. I love the finished look of a serger on side seams. They are very handy and fast. The right kind of scissors can make a huge difference too. You will need dress shears or scissors. These scissors blades are designed to cut fabric better. You’ll need notions like pens, needles, thread, bobbins, etc. Most anything else you might need to make a project will be specified on the back of your pattern.This is my serger and just love it.


Don’t get hog wild and run out and buy a complicated project. Start small, like pillow cases or curtains or a simple apron. These are usually beginner projects.

There are all kinds of classes on the internet or in your hometown that someone might demonstrate and there are sewing dvds from companies. Check with your local community center or Library. Learning this hobby can turn out to be profitable. Look at people who do alterations for people or sew for the public. I wouldn’t trust my self to sew for the public. But home made gifts are really nice come Christmas time. I have also taught myself to crochet. Of course I’m still learning. I still have things from my Greatgrandmother that she crocheted for me.

I think the hardest project I have tackled is mens dress shirts. Oh My Goodness. Dont let that be your first project. lol. These take patience. Trust me.

Let me take the time to show you some projects I have made.
I have made goat coats before, yep, goat coats to keep them warm. I even drew my own pattern.


Ive made a few aprons


I even made little pockets to put things like my hoof trimmers in and hang up in the barn. 
There are more projects I have to do. I have made myself simple skirts and dresses before. I’m going to learn how to make Polo shirts for the boys and husband. Next, I would love to get an embroidery machine and have someone teach me to use it. These are some quilts that my sister made for the boys beds:


Remember to keep it simple and don’t get overwhelmed.

I’m going to leave you now with some great websites for sewing and crafting. Any articles I might print are always printed with permission in exchange for helping advertise each others websites and blogs. All authors get full credit for their articles. If any links do not work just copy and paste them into your browser.
Little House Living: at littlehouseliving.com


One of the best ways to cut household costs is by sewing your own clothes, bags, and toys. However, if you have to pay a lot for patterns, some of those savings go down the drain! Thankfully, there are lots of fun and FREE printable sewing patterns available to use.
 | |
Plus, when you sew your own items, you know your items will be durable and beautifully customized to your tastes. Check out these free printable sewing patterns and see what fits your personality:
For the Home
Free Printable Sewing Patterns (mostly crafts, home decor, and toys) at Craft Buds
Butterick’s has a nice selection of free patterns for women, children, and the home
For Women
For Baby and Kids
16 DIY Upcycled T-Shirt Projects

By contributing writer Jackie
Over the past couple of years I have shared several ideas for turning on old T-shirt into something else. Today I thought I would gather all of those ideas in one place.
So, if you have a lot of old T-shirts lying around and don’t know what to do with them here are 16 ideas that might spark your creativity.
1. Make a Rug from a T-Shirt
| The Happy Housewife")
If you have ever been intimidated by the thought of making a T-shirt rug but love the way they look, then you need to check out this tutorial. Using a sewing machine to make a T-shirt rug is much faster than traditional methods.
2. Make a Shrug from a T-Shirt
| The Happy Housewife")
This T-shirt shrug takes an old idea and puts a new spin on it. Check out the tutorial for all the details.
3. Make a Necklace from a T-Shirt
| The Happy Housewife")
This no-sew T-shirt necklace is a great addition to any outfit. Find out how you can make one by following this tutorial.
4. Make a Wreath from a T-Shirt
| The Happy Housewife")
Turn a T-shirt into a decorative wreath by following this tutorial.
5. Make a Dress from a T-Shirt
| The Happy Housewife")
Use two T-shirts to make a dress for your little one by following this tutorial.
6. Make a Skirt from a T-Shirt (Method 1)
| The Happy Housewife")
This little skirt is made from a T-shirt and a pair of too short pants. Find out all of the details in this tutorial.
7. Make a Skirt from a T-Shirt (Method 2)
| The Happy Housewife")
Here’s another method for turning a T-shirt into a skirt.
8. Make a Headband from a T-Shirt
| The Happy Housewife")
This tutorial will show you how to turn a T-shirt into a headband to match any outfit.
9. Make Baby or Toddler Pants from a T-Shirt
| The Happy Housewife")
Using a pair of pants that fit your child as a pattern, you can make a pair of pants from a T-shirt by following this tutorial.
10. Make a Gift Bag from a T-Shirt
| The Happy Housewife")
Turn a T-shirt into a decorative gift bag by following this drawstring gift bag tutorial.
11. Make a Pillow from a T-Shirt
| The Happy Housewife")
T-shirt scraps can be turned into a decorative pillow by following these instructions.
12. Make Yarn from a T-Shirt
| The Happy Housewife")
Follow this tutorial to give new life to an old T-shirt by turning it into yarn.
13. Make Napkins from a T-Shirt
| The Happy Housewife")
An old T-shirt can become a cloth napkin. Find out how by following this tutorial.
14. Make a Produce Bag from a T-Shirt
| The Happy Housewife")
Ditch the plastic produce bags and make some out of T-shirts instead. Find out how here.
15. Refashion a Maternity Shirt
| The Happy Housewife")
This tutorial offers a few ideas for refashioning a maternity shirt (or even an oversized T-shirt).
16. Make an Apron from a T-Shirt
| The Happy Housewife")
Learn how to make a simple apron from an old T-shirt by following this tutorial.

 A knitting loom?! Why it’s the most fantastical invention ever for lame-o and would-be knitters.
I’ve tried to learn to knit, really I have. I know the basic stitches but every time I start knitting something, all loose and soft at the beginning, it turns tight and lumpy by the middle. I just don’t seem to have the attention span for it.
Enter the knitting loom.

There are several different brands and styles but the basic idea is that there are a bunch of pegs on a frame, evenly spaced, and onto those you “knit”. The round ones can be used for hats and even socks. The rectangular ones can be used for scarves and blankets. I’m more of a visual learner so I went to YouTube to learn how to use them because the printed instructions were lost on me. Once I saw it, it really wasn’t complicated. We also bought a book…that my husband read and figured out. Division of labor, baby!
You weave yarn in and out around the pegs and use the tool to lift the bottom layer over the top layer of yarn, peg by peg, creating stitches as you pull them off the pegs. Then you rewind and go at it again. Go watch this video. And this one.


Bottom line, these things are so easy to use, nearly impossible to mess up and provide a way for everyone in the family to make something useful and beautiful.
Patrick, over at Survival at Home sent me a pic of his wife in a knitted head warmer that he made for her – sweet. You only get half the result of a hat but if what you need is warm ears, it works and it’s only half the work. Here’s from High Hill Education, another homeschooler’s post on knitting looms – love fun school/service projects!!!
So, if you’re already good at this loom knitting thing, you can go here to learn how to make socks!!!
If you’d like to knit fur reelz and you want to look uber cool in front of your fiber friends, learn how to make your own knitting needles at Green Eggs and Goats. AND, when you’ve done that, you can knit these with your new needles, also from Green Eggs and Goats.
If you need to make a scarf for a quick gift that requires no knitting of any kind, here’s this from The Untrained Housewife.
10 New Ways to Upcycle Old Jeans Into Great Gifts!
Don’t let your old jeans go to waste! Make something cool out of them. Here are 10 ways to upcycle old jeans and all of them would make great presents!

I hope this round up of jean recycling ideas inspires you!

Here are two presents you can make – a super cute apron and a garden tool caddy! via Fiskars

Another great gift idea – a denim hat can be worn by a boy or a girl. via Michele Made Me

This cute stick horse is a really easy toy to make! via Utopia Rose

This is a good phone caddy via Instructibles

This bracelet is made from the seam of old jeans (there’s also a matching ring). via Favecrafts

How about a denim drink cozy? via Fiskars

You can add appliques or emboidery to old jeans to make this cute notebook cover. via Planet Forward

This is a jean backpack! Isn’t it cute! via Gina’s Craft Corner

What mom wouldn’t love these pretty and sturdy bibs! via Thimbly Things
If you’d like more ideas for recycling your old jeans check out my other posts:
How to Sew a Ruffle (Multiple Methods)
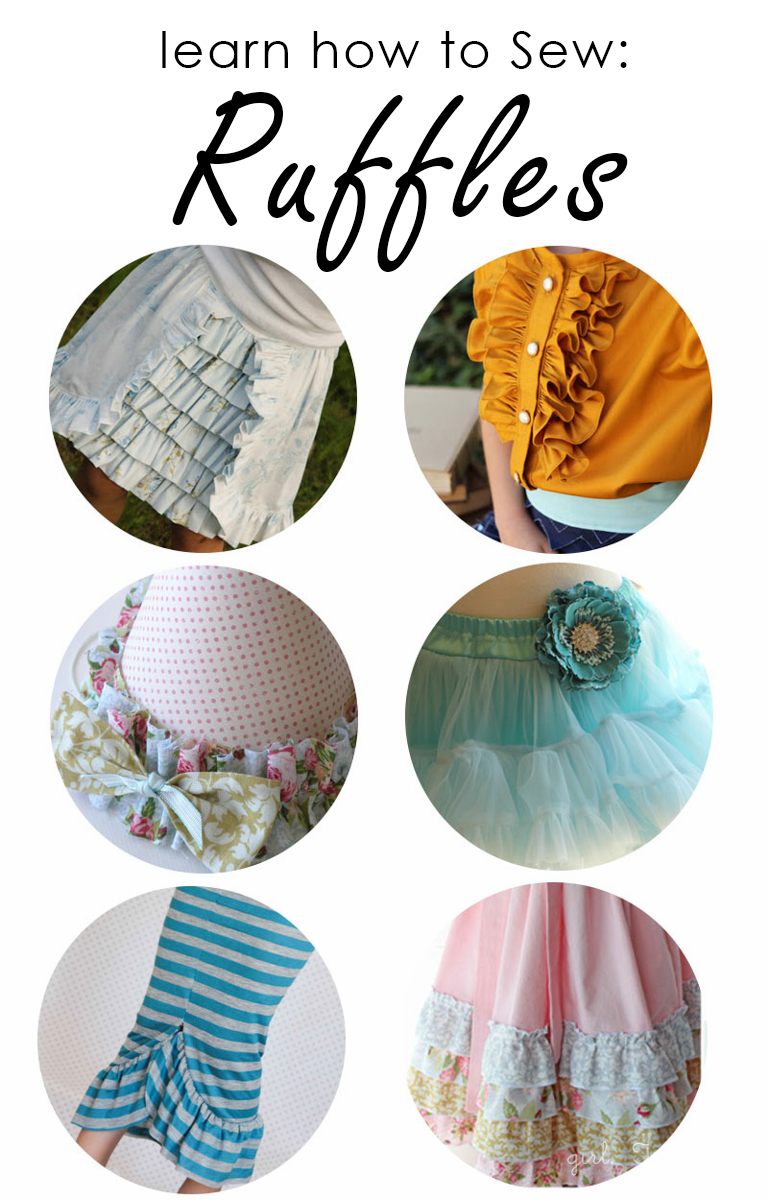
Hey friends! Things are super crazy busy around here, and though I can’t share any of the fun quite yet, I do have a really great techniques post for you today. Ruffles are one of the sewing techniques that first pulled me into garment sewing and I have to admit that I still have a soft spot for their flowy, feminine charm. If you love ruffles as much as I do, but aren’t sure where to begin, today I’m going to show you four different methods to sew a ruffle.

For this technique, I cut strips of fabric in 4 ½” sections; this width will vary depending on the project for which the ruffle is intended and the needed hem/seam allowances. Cut the fabric strip from selvage edge to selvage edge. In general, you will want the length of your fabric strip to be 2-3 times the length of the finished ruffle that you desire. A fuller, more gathered strip will require more length while a lightly gathered ruffle will require less. For the purposes of learning the ruffling techniques, we are not going to worry about the raw edge of the ungathered side of the strip. However, when sewing a ruffle for a finished garment/home décor project, you will probably want to finish the edge opposite the gathers prior to gathering/ruffling. A rolled/narrow hem works great (here’s a rolled hem video tutorial), as does turning the edge under ¼” and then another ¼” and stitching close to the edge. For crafting projects, people will often leave the edges unfinished for that fun, frayed edge effect.
How to sew a ruffle
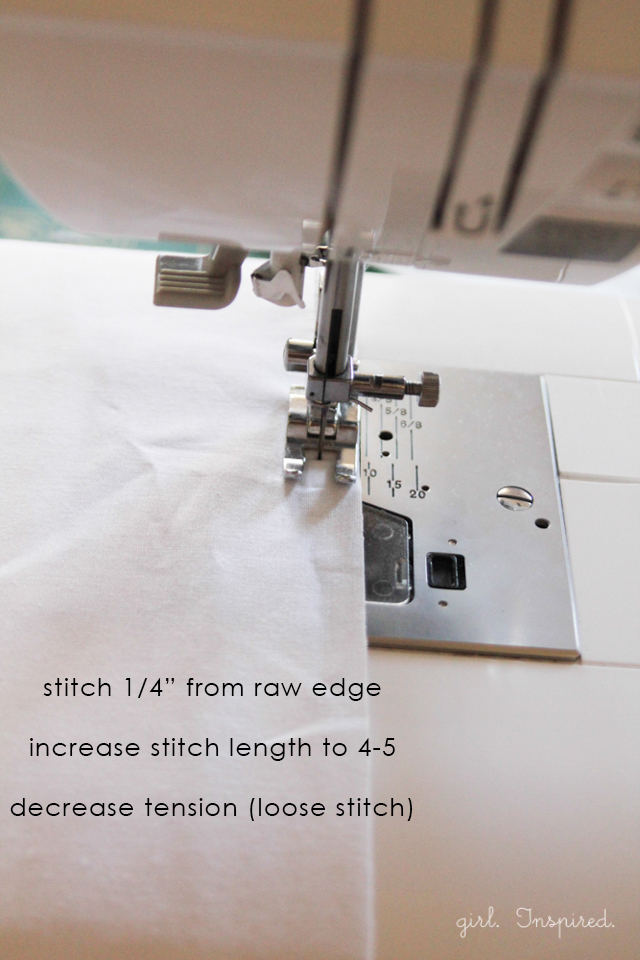
To turn your fabric strip into a ruffle, it is quite simple. Change the settings on your sewing machine to a long stitch length, with low tension (a basting stitch). Stitch about ¼” from the raw edge, leaving long tails at the beginning and end of your stitch lines.

Remove the strip from your sewing machine. Find the bobbin thread tail on one end of the strip and begin pulling. The fabric will begin to gather. Continue to pull the bobbin thread and work the fabric down until the entire strip is evenly gathered and the length you desire. Be very careful that you don’t pull the thread all the way out from the other side! This is the most basic method to form a ruffle.

For more evenly gathered ruffles and for ease of attaching a ruffle to another piece of fabric, I like to sew two parallel lines of basting stitches. You follow the exact same steps as above, but sew a second row of stitching ¼” below the first row of stitching.
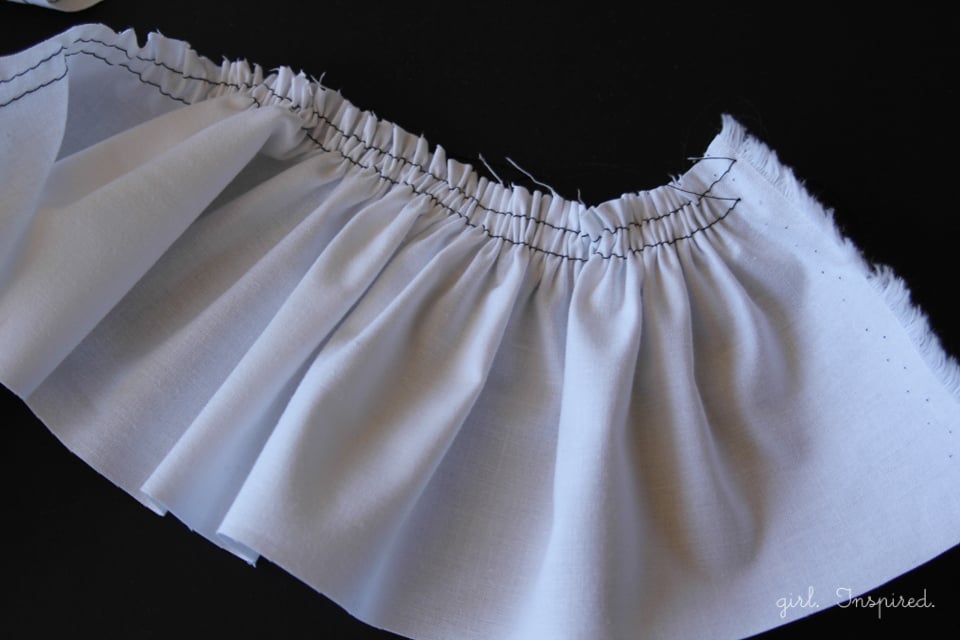
Note that the fabric gathers more evenly as you pull the bobbin threads together at the same time.
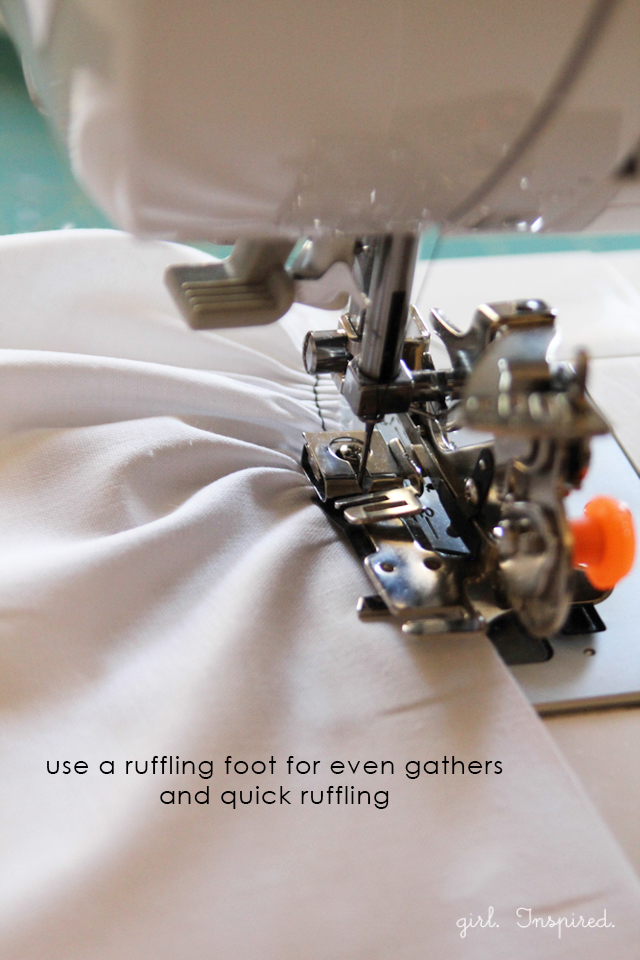
If you’re going to be sewing a lot of ruffles, you might be interested in a ruffling foot for your sewing machine. This makes ruffle sewing SO easy. You simply remove your standard presser foot and replace it with the ruffling foot (you can see the one that I have through my affiliate link here) . Place the fabric strip between the plates on the ruffling foot, adjust the settings on the foot for fullness, and stitch (your sewing machine settings should be standard length and tension – the foot does all the work for you). The ruffling foot will turn out a perfectly gathered piece of fabric, no bobbin thread pulling necessary! The main drawback to the ruffling foot, in my opinion, is that it takes more work to make sure that the settings are correct to give you a finished ruffle at the length you require for your project.
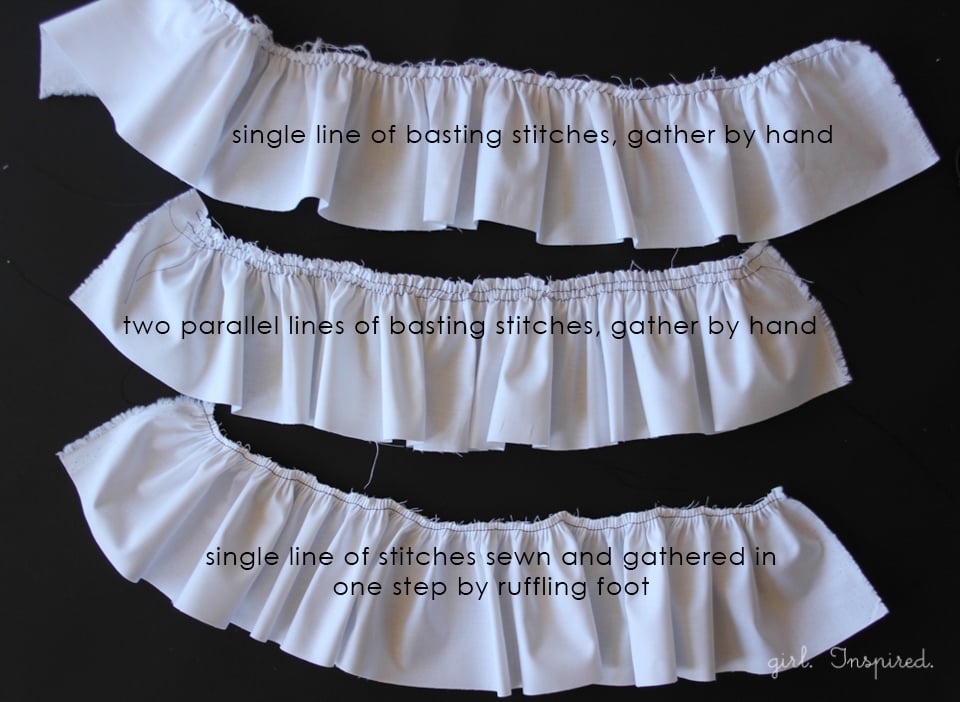
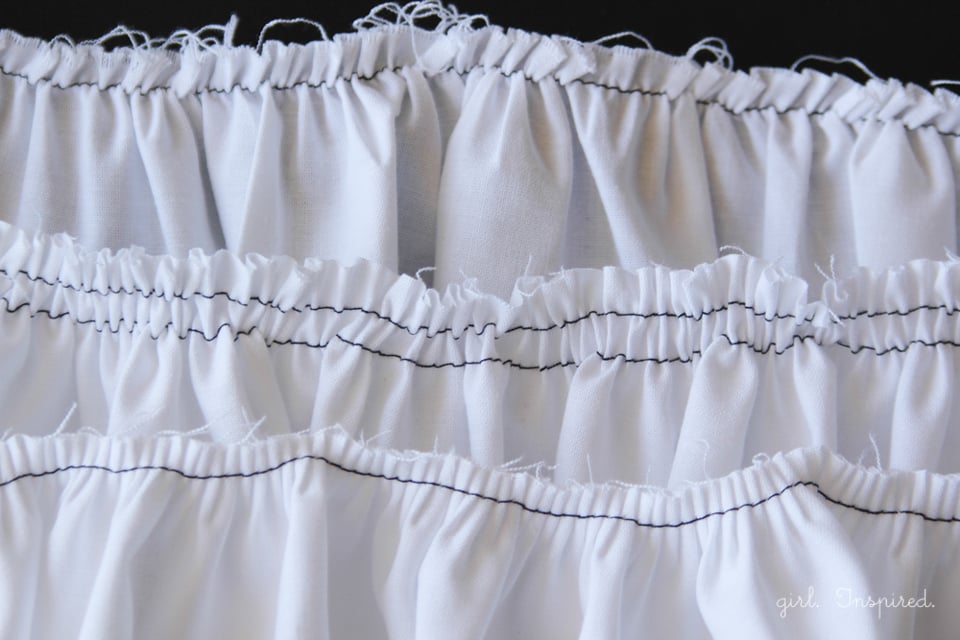
You can see the three variations in the pictures above. Regardless of your method, you will want to press and steam the gathers once you have them even and at the desired finished length. This will help set them and make it easier to work with the ruffle as you continue with your project.
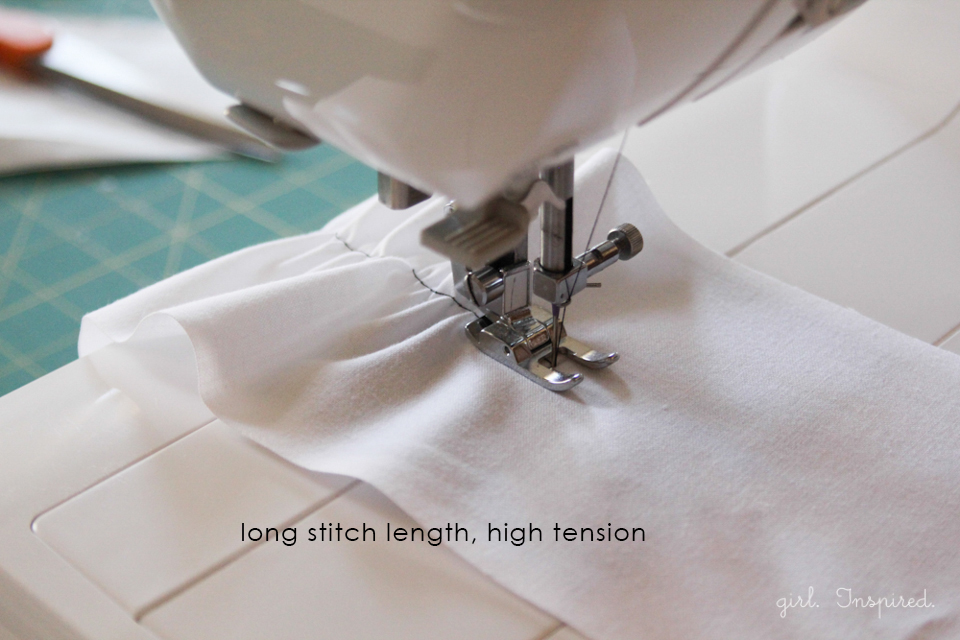
One last method that is really fun for producing a quick ruffle where precision isn’t necessary, is to place the fabric strip in your machine, increase the stitch length and crank UP the tension, so it is super tight. Then, just stitch down your fabric and that tight tension will ruffle the fabric for you.

This method doesn’t really allow for much adjustment in the gathers, but it is probably my favorite method for quick craft project ruffles or even creating party décor, such as ruffling crepe paper, like in the picture above. So, go experiment with these ruffling techniques and get to know the method you’re most comfortable with and which settings work best on your particular sewing machine. For more tips on gathering fabric and attaching a ruffle to another piece of fabric (such as attaching a gathered skirt to the bodice of a dress), you might like this Sewing Basics: Gathering.
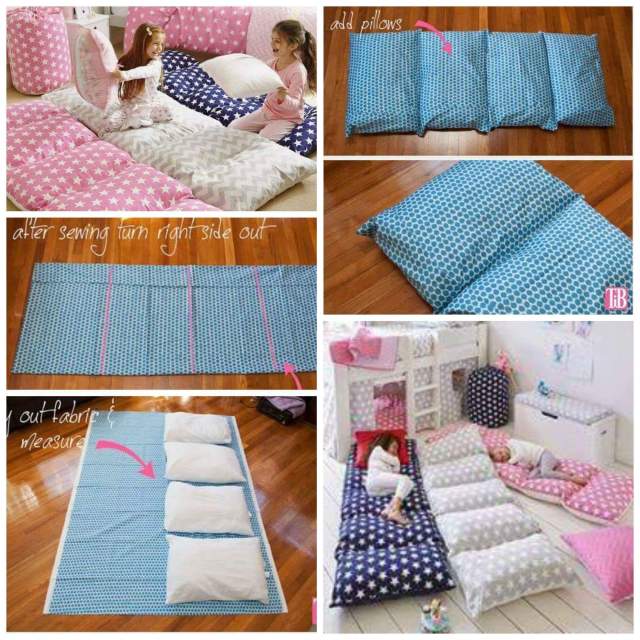
Once you have your gathering/ruffling technique down, the options are really limitless. You can find full tutorials for some of the projects shown in the collage above by visiting the Sewing Tutorials and Patterns tab or by clicking below:
Sign up for a great newsletter at youcanmakethis.com they have all kinds of pdf patterns that are awesome.
Here is a good tutorial for a sweater pillow: http://www.thehappyhousewife.com/home-management/sweater-pillow/
Tip Junkie 16 Easy Sewing projects and patterns: http://www.tipjunkie.com/post/easy-patterns/
Good information and patterns at http://www.sewing.about.com
Awesome Purse Tutorial: http://www.tearosehome.blogspot.com/2011/09/tutorial-she-carries-flowers.html?utm_source=feedburner&utm_medium=email&utm_campaign=Feed%3A+TeaRoseHome+(Tea+Rose+Home)&utm_content=Yahoo!+Mail
Lingerie tutorial:
Baby shower gifts tutorial:
Lindsay Wilkes (me): http://www.thecottagehome.blogspot.com
Amy Ellis: http://www.amyscreativeside.com
Heather Valentine: http://www.thesewingloftblog.com
Kelly Bowser: http://www.kelbysews.blogspot.com
Stephanie Struckmann: http://www.totallystitchin.net/members/the-sewing-corner/
Sew News Magazine: http://www.sewnews.com
Koala sewing cabinets: http://www.mykoalastudio.com
Tip Junkie

Econobusters

The Cottage Home

Tea Rose Home
Luvin the Mommy Hood
http://www.luvinthemommyhood.com
http://www.luvinthemommyhood.com
Sewing Patterns
http://www.sewingpatterns.com
http://www.sewingpatterns.com
You Can Make This
http://www.youcanmakethis.com
http://www.youcanmakethis.com
Moms Crafty Space

Graceful Words

Lady Farmer Parables

Cluck Cluck Sew

A Cultivated Nest

Our Simple Country Life
Recycled Fashion
Don’t forget your fabric stores like in my area are Hancock Fabrics, and Joanne Fabrics ,you can sign up for newsletters and receive special deals in your email. Check out some of the links on my right sidebar too.

Most of all have fun with your sewing.
No comments:
Post a Comment