

All recipes (other than mine) and articles have been printed with permission in exchange for helping advertise and promote other blogs and websites. All original authors get full credit for their articles. Also, If you have trouble with any links I have provided just copy and paste them into your browser.
If you’ve wondered what to do with all that goats milk, well, make you some cheese. You dont necessarily have to have goats milk to make you some cheese. Some of these simple recipes can take ordinary store bought milk. Yep, cheesemaking simplified. I use store bought and raw goats milk for my cheesemaking. I do not pasturize and it has not killed me.
Here is a great article that I feel you need to read before you start out on your cheesemaking journey. The article is from Hoegger Goat Supply blog. Printed with permission.
Getting Quality Milk For Cheesemaking
Good quality milk makes for good cheese. I often get asked to solve cheese-making problems that are the result of poor milk handling practices. You must have good, properly handled milk if you want to have consistent results with your cheese making. While it is possible to make cheese from raw milk I prefer to use heat-treated or pasteurized milk because it helps to hold the bacteria at bay and I have better results when making cheese. This is especially important when it comes to having your own dairy animals.

Whether you are using store bought milk, have your own dairy animals or you find a local farmer you can purchase milk from, you need to make sure that you get the best quality of milk. Bad milk will never make good cheese.
It is important to understand that with milk used for cheesemaking there is a fine balance between having enough acidity to help set and age the cheese and having too much which will cause the milk to curdle. Acidity is also a factor in developing the flavor and preserving your cheese. There are multiple things that affect acidity of the milk..
How old is the milk? Milk naturally becomes more acidic as it ages. How the milk was handled after leaving the animal and how quickly it was cooled? Even what time of year the dairy animal was milked can affect the acidic level of the milk. Late lactation often increases the acidic level of the milk.
Milk is the perfect breeding ground for bacteria. When you introduce cheese cultures to your milk you are actually adding positive, beneficial bacteria. When a recipe calls for milk to be held at a certain temperature, it is because that is the best temperature for that specific cheese culture bacteria to flourish. Proper handling of the milk keeps the negative bacteria levels low so that the good bacteria can flourish. I actually think about the good and bad bacteria as a war. You want to get enough of the good bacteria growing before the bad has a chance to get a foothold.Poorly handled milk ensures that you will lose this war and your cheese will be the victim.
Are your ready to make cheese but need milk? There are basically 3 ways to get it: buy it from a store, get your own dairy animal, buy it from a local dairy.
Store Bought Milk:
This is safe as it is already pasteurized. Just be sure to buy the freshest you can get. Whole milk works best for making cheese with store bought milk. Sometimes you can have a problem with a softer set using store bought milk. The addition of calcium chloride will help you get a firmer set. Do not use calcium chloride when making mozzarella, as it will interfere with the stretch.
Your own Dairy Animals:
Be it cow, goat, sheep, buffalo, whatever; it is fantastic if you have your own milk supply! Just be sure to use good handling and cooling methods to insure you keep bacteria levels low. It is very important that you strain you milk and put it in the fridge. I did a test a few years back and I found that milk put into 1-quart jars and placed in the refrigerator took 8 hours to reach 40 degrees. That is way too long and bacteria are growing by the billions. Dairy standards say that milk should be cooled to 40 degrees or less in 30 minutes. It is critical for successful cheese making that you do a good job of getting that milk cooled quickly
I also personally prefer to heat treat all milk coming into the house. I know that a lot of people prefer to use raw milk but I consider it just too risky. If using raw milk to make cheese you need to cool it very quickly in an ice water bath while stirring. I would not keep it very long before making cheese or else make cheese as soon as the fresh milk comes into the house. Once you inoculate it with a culture you would get the good bacteria growing right away. You cannot hold milk in the fridge for a while and pasteurize later. By then it is already growing whatever bacteria were present. If you opt to pasteurize you must do it while the milk is fresh from the animal.
Purchasing milk from a Farmer:
If you are planning on purchasing milk be it cow or goat from a local farmer there are some things you need to ask before you make the purchase. Take a look around the dairy, is it clean? You’ve got to be able to trust that this dairy is maintaining high standards before you bring their milk into your house. The number one question I would ask is what method they use to cool the milk. If they are not following a quick cooling method such as the ice water bath method or heat-treating their milk then you need to walk away.
I had a call from a fellow who had gone the route of buying milk from a local source. It happened to be goat milk. He had purchased 10 gallons of goat milk and brought it all home and set out to make cheese. It all curdled the minute he went to heat it up. I got a frantic call asking what he could do now. I had to tell him that he had to throw it all away. It was not properly cooled. It had already been growing a culture of its own. Was way too acidic already and curdled instantly when heated. There is nothing you can do to save cheese that has gone wrong because of poor milk. When it comes to purchasing milk from a local source, it is buyer beware. I would also recommend tasting a sample of the milk you are purchasing. It should be sweet and delicious right from the animal. If it has any off flavor at all it will only be magnified when you make cheese.
Hoegger Farmyard Contributer
Mary Jane Troth
When I raised dairy goats, I had extra milk so I started out making a simple cheese. I was nervous at first but got to wondering, “What in the world took you so long?” It is wonderful. My first recipe is as simple as you can get so that will be good for you to start out with.

You will need a few items to get started.

You will need stainless steel, or glass pot that is large enough to hold 1 to 3 gallons of milk depending on recipe. Stainless steel perforated Ladle,Dairy Thermometer, Cheesecloth, not the kind from a fabric store but a cheese making supply company. There is a difference in the thread count. A good colander. Then you will need to order your cultures from a cheese making supply company. I would like to recommend New England Cheesemaking Supply Co. http://www.cheesemaking.com I love their prices and their friendly customer service.

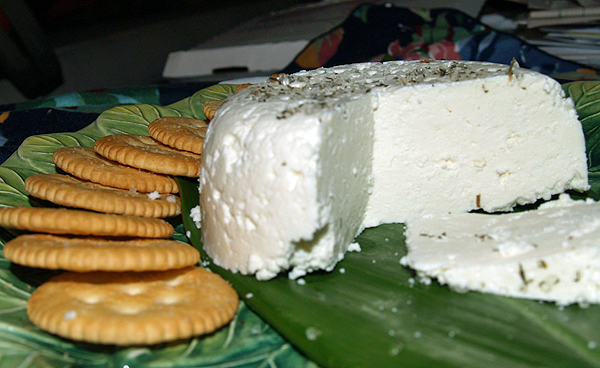
This first recipe is a Chevre’ which is french for Goat. It is a cream cheese consistency. You can make a sweet, herbal, or spicy version. Your cheese is your base, you can add anything you like to give it extra flavor.
Equipment you will need:
Stainless Steele pot that hold 1 or 2 gallons of milk, perforated ladle, dairy thermometer, colander, and cheesecloth.
Chevre’
1 gallon whole goats milk (or one gallon pasturized store bought milk)
1 packet direct set chevre’ starter (cheesemaking supply company)

1. Heat the milk to 86 F.  Add the starter, stirring to combine.

 Add the starter, stirring to combine.

2. Remove from heat. Cover and let set at a room temperature not below 72 F for 12 hrs. (Best time to do this is at night, so it can set while your in bed, get up next morning and drain.)
3. Line a colander with cheese cloth.  Gently ladle curds into colander.
 Tie the corners of the cloth into a knot and hang the bag somewhere over a pot to drain 6-12 hrs. (I have drained mine for 4 helping to squeeze out some every once in a while if I was in a hurry).
 Gently ladle curds into colander.
 Tie the corners of the cloth into a knot and hang the bag somewhere over a pot to drain 6-12 hrs. (I have drained mine for 4 helping to squeeze out some every once in a while if I was in a hurry).
4. Remove from cloth, stir or hand press spices or seasonings in. Store in air tight container in the refrigerator for up to 1 week.
The sweet version can be served with fruit with a fruit syrup or glaze. The other versions can be served with crackers.


I hope you enjoy this first recipe to start out with.
Homemade yogurt:
Here is a quick and simple way to make your own homemade yogurt at home.
Here is a quick and simple way to make your own homemade yogurt at home.
You will need:
1-qt. milk (storebought or goats milk)
1/2 cup live culture yogurt (storebought is fine)
cooler or roasting pan (this acts as your incubator)
jars and lids or some kind of bowls or cups with air tight lids.

1-qt. milk (storebought or goats milk)
1/2 cup live culture yogurt (storebought is fine)
cooler or roasting pan (this acts as your incubator)
jars and lids or some kind of bowls or cups with air tight lids.

Step 1- heat milk to 180 degrees
Step 2-let milk cool down to 110 degrees. While your milk is cooling, boil some water on the stove. Ill tell you in a minute what to do with that.
Step 3- prepare jars with lids or some kind of cups or bowls that have an airtight lids on them.
Step 4- after milk has cooled to 110 degrees, pour in some kind of sweetner like powdered sugar or honey etc. and your yogurt culture. Pour into jars to neck line, tighten lids. Place jars or bowls or cups in cooler or roasting pan.
Step 5-Remember your hot water you were boiling, pour that in there now over your jars. If you have lids that will not pop off due to hot water, cover the jars with that water or if your using a roasting pan like me, pour just to the neck of the jars.. Use caution, water is hot and the steam will burn.
Step 6- cover roasting pan with lid and put on lower rack of stove. or if you are using a cooler, just close lid on cooler and cover with a towel and sit in a place where no one disturbs it. Let incubate overnight.
Step 7- close oven door and turn oven light on. Let incubate over night.
The boiling water incubates the milk believe it or not. This is a good way to not use so much electricity. The cooler is well insulated to hold the heat and in the oven, the light keeps it at a certain temp too.
In the morning put jars or containers in fridge to chill. After a few hours you can dive right in. Now I must say homemade yogurt will not be as thick as storebought. So if it doesnt thicken enough for you, you can always enjoy it like a smoothie. If mine doesnt turn out that thick, I have put a straw in it and had it with my meal. yummy.
You can add things like fruit too.
I would like to recommend an awesome book to start out with by Ricki Carrroll. You can find her book anywhere but you can get it from the Cheese making supply company store I recommended above. It is my how to book when I need to know something. It is easy to understand.

She also has a how to dvd which is awesome. I am a visual learner and I love this dvd.
How to Make Feta Cheese (mild)
Ingredients:
- 2 Gallons Milk (cow, goat or sheep)


- Feta Culture: 1/8 teaspoon DVI
- Liquid Rennet: 1 teaspoon
- Water: 1/2 cup cool
- Kosher Salt or Cheese Salt
- Calcium Chloride if using store-bought milk
.
Equipment:
- Cheese Vat or Stainless Pot (2 Gallon) do not use any aluminum pots
- Long knife to cut the curds
- Flat Dish (glass or plastic) for salting cheese
Instructions:
1. Warm Milk to 86 Degrees F. Sprinkle the DVI Feta Culture over the warmed milk, and stir well.
2. Only do this step if using store bought milk– Add 1 teaspoon calcium chloride, mixed into 1/2 cup cool water and stir into the milk.
3. Let ripen for 1 hour
4. Mix rennet into cool water, and stir into milk. Cover, and allow to set for another hour to coagulate.
5. Cut curds into 1 inch cubes and allow to rest for 5 minutes.
6.Stir curds gently every 5 minutes while keeping them at 86 degrees for 15 min. This is best achieved by placing the pot into a sink of hot water or using a double boiler.
7. Line a colander with cheesecloth, and pour the curds into the cloth. Collect and tie together the four corners of the cheesecloth to form a bag with the curds at the bottom. Hang to drain 4 to 6 hours
8. Once drained, remove the cheese from the cheesecloth and slice into 3 slabs. Each slab will be about 1 and 1/2 to 2 inches thick. Lay them into a flat glass or plastic dish and sprinkle both sides lightly with cheese salt.
9. Allow the cheese to set at room temperature for 24 hours. While at room temperature, turn the cheese over 2 or 3 times salting each side again. Total amount of salt used should be about 2-3 tablespoons. The cheese will weep liquid and firm up during the salting process. Liquid can be drained off or left on the cheese. I prefer to drain it off myself. Refrigerate and age 5-7 days.
Marinated Feta:
Now that you know how to make feta, try kicking it up a notch by marinating the cheese. Delicious!
You will need:
Mild or strong Feta
- Jars with lids
- Olive Oil
- Choice of herbs
For best flavor use aromatic herbs
Choose 3 or 4 from the list below, you can make any combination you like, this is where your imagination can go wild. My favorite combination is Basil, Garlic and Rosemary. Be creative and discover what your favorite flavor is.
- Basil
- Bay Leaves
- Fennel
- Garlic Cloves
- Hot Peppers dried or fresh
- Marjoram
- Onion
- Oregano
- Peppercorns, black, pink or white
- Rosemary
- Sun dried tomatoes
- Thyme
- Greek Peppers
- Olives
Cut or break the cheese into small pieces, about 1inch in size. Layer any combination of cheese and herbs into the jar. Cover with oil. Place on cupboard and allow the cheese to marinate. As long as the cheese is covered completely with the oil, it will be preserved and does not require refrigeration. Cheese flavor improves with age.
Tip: Once the cheese is gone you can strain, then use the oil to add flavor to your dishes or make a wonderful salad dressing.
Hoegger Supply has everything you need to get started. As you see, it does not require a lot of ingredients to make feta.
Here is another good cheese recipe from Cheesemaking.com:
EDAM
Submitted by a customer to Cheesemaking.com
EDAM
Submitted by a customer to Cheesemaking.com
Ingredients:
2 gallons whole milk (cow)
1 tsp calcium chloride in 1/4 cup water
4 drops annatto coloring in 1/4 cup water (optional)
2 ounces prepared mesophilic starter culture or 1 packet direct set or 1/4 tsp from large packet
1 tsp liquid rennet in 1/4 cup water
4 cups salt in 1 gallon of water (brine solution)
1 tsp calcium chloride in 1/4 cup water
4 drops annatto coloring in 1/4 cup water (optional)
2 ounces prepared mesophilic starter culture or 1 packet direct set or 1/4 tsp from large packet
1 tsp liquid rennet in 1/4 cup water
4 cups salt in 1 gallon of water (brine solution)
Directions:
Pour milk into double boiler and slowly raise milk temperature to 86’F. Add starter culture and stir thoroughly for five minutes. Remove from heat and cover. Let stand for 30 minutes.
Add calcium chloride and color if desired. Stir thoroughly for five minutes. Allow to set for 10 minutes.
Place double boiler back onto heat source and raise temperature to 86’F. Add rennet and stir thoroughly for five minutes. Cover, and allow to set at 86’F for 30 minutes or until a clean break is achieved.
Cut curds into 1/2″ squares and gently stir for 15 minutes. Allow curds to rest for 10 minutes.
Slowly raise temperature to 96’F. Remove whey down to top of curds (keep track of amount) and save for later use. Keep temperature of whey at 96’F.
Heat equal amount of water to 96’F. Slowly add water and stir until curd is firm (approximately 20 minutes). Allow curds to settle for 10 minutes.

Pour curds into stainless colander, cover with a heavy dinner plate, and allow to drain away remaining whey for approximately 5 minutes.
Place curds in a cheesecloth lined cheese mold and press at 30 lbs. pressure. Every 45 minutes, dip cheesecloth-lined curds in hot whey, flip, and return to mold. After 3 hours of alternate pressing and flipping, press at 30 lbs. pressure for an additional 12 hours.
Remove cheese from mold and remove cheesecloth. Soak in brine solution for 2-3 days at 60’F, flipping cheese every 12 hours.
Remove cheese from brine, place on cheese mat, and allow cheese to mature uncovered at 60’F for 3-4 weeks, flipping daily.
Wax cheese and age in refrigerator for 3-8 weeks at 45-50’F, flipping twice per week for the first few weeks.
Oh My Gosh look at this recipe: Gotta try this one
Cajeta Making 101 Goat Milk Caramel Made Easy.
By Ben Guyton at Hammer on Rye
Cajeta Making 101 Goat Milk Caramel Made Easy.
By Ben Guyton at Hammer on Rye

If you want the best dessert topping in the world. you HAVE to make cajeta. Dessert topping, flavoring for your coffee, a spoonful for your mouth whatever you decide to do with it, it’ s worth the time. Cajeta is basically a dulce de leche or caramel made from goats milk and sugar. The milk is heated until the sauce thickens, browns, and gets super tasty for your mouth. I have made plenty of cajeta, but since I got back from Mexico in February, I have been making it in a copper pot, also known as a cazo de cobre. It is a traditional way to make cajeta, and really helps to speed the process because of the excellent conduction and distribution of heat. If you don’t have a copper pot, you can use a heavy pot as long as it’s not cast iron.
On to the recipe. First thing’s first you need some goat milk. Lucky me, I live on a goat dairy. For my recipe, I used a gallon of milk. It condensed down to about two and a half pints. Here’s all the ingredients you will need:
1 gallon goat milk
4 cups of sugar
1 tablespoon of vanilla extract
1/2 teaspoon of baking soda dissolved in a tiny bit of tepid water
4 cups of sugar
1 tablespoon of vanilla extract
1/2 teaspoon of baking soda dissolved in a tiny bit of tepid water
Pour your milk into your pot and add the sugar and vanilla. Turn the heat on medium and stir it all up.

Heat the milk to a nice simmer, stir frequently. Add the baking soda and water mixture. You may want to take the pot off the heat because it will bubble up when you put in the baking soda. I just add it very slowly and it doesn’t foam up too much.

Keep simmering and stirring.

Slowly, the milk will start to evaporate and the sauce will begin to thicken.

Keep stirring often.

When it is as thick and dark as you like it, remove it from the heat. I have found that I like mine very thick and very brown. If you want your sauce to be thinner stop sooner. Thicker? Stop later. Just don’t let it burn and keep stirring.

It’s all a matter of your taste.

When it’s done, pour it into a heat safe pitcher (or straight into heated jars). Then pour into some canning jars and store in your fridge.

This photo is from a previous batch that was thinner and lighter. Enjoy!
May have to try this one too
Another Take on Coffee Cheese, but with Goat’s Milk This MonthJuustoa (juustalopeia) Cheese
1 gallon raw milk
1 Tbsp corn starch 1 Tbsp sugar 1/2 tsp salt 1/8 tsp liquid rennet (I use slightly less for double strength rennet)
Heat milk to about 85F.
Mix dry ingredients together with 1/2 cup milk and stir into warmed milk.
Add rennet to 1/4 cup cool water, and stir thoroughly into warmed milk.
Cover and let set for about an hour until clean break.
Then cut into 1 inch curds (you don’t have to be fussy, which is one reason I love this cheese), and pour off the whey.
Drain in colander lined with fine cheesecloth (butter muslin).
Either hang to drain or work the curds occasionally to get the whey out.
When most of the whey has been separated, press the curds into a cake pan and cook under the broiler until lightly browned, pouring off the whey occasionally.
Watch closely as it will brown quickly. If desired, flip and brown the other side as well.
Then bake at 400F for 15-20 minutes.
Serve with Lingonberry jam or other jelly. Can be frozen and reheated.
Joy Metcalf, Northport, Maine |  |
By Sonia Martinez at Sonia Tastes Hawaii
Queso blanco is simply ‘white cheese’. In Cuba we used to also call it farmer’s cheese or ‘queso de campo.’
Queso Fresco (Fresh Cheese) and Queso Blanco are slightly different in texture although even in Mexico or South America the two names are sometimes used interchangeably. They are similar in taste and style but made differently.
Queso Fresco is made with rennet and will melt when heated.
Queso Blanco can be made with lemon juice or vinegar and will soften but not melt when heated but can be sliced and fried.

Equipment needed:
Heavy bottom pot large enough to hold the amount of milk
Colander
Large bowl or 8 cup measuring cup
Cheesecloth
Skimmer
Colander
Large bowl or 8 cup measuring cup
Cheesecloth
Skimmer
Queso Blanco
1/2 gallon (2 quarts or 8 cups) whole milk*
1 Tablespoon sea salt
3 Tablespoons distilled white vinegar or lemon juice
1 Tablespoon sea salt
3 Tablespoons distilled white vinegar or lemon juice
*I used 1 cup half & half and made up the rest of the milk amount with the whole milk. It gave the cheese a little creamier consistency.
Line the colander with a couple of plies of cheesecloth. Make sure to place the colander over a bowl or an 8 cup measuring cup to catch the whey.

Pour the milk in the pot adding the salt. Heat until just to the boiling point stirring every once in a while. Do not let it stick to bottom or boil over.
Turn to low and add the vinegar or lemon juice, stirring for a bit. Turn heat off.

Skim the curds into the colander that has been lined with cheesecloth. Pour the rest of the whey to drain so that you can catch every bit of curds. Let it sit for a bit while draining. You might squeeze it a bit.

Unwrap the cheesecloth and press cheese into the mold, plate or bowl. If you want a denser consistency, press out the remaining liquid by placing a plate over the cheese and a weight over it. Let it sit for about an hour or so.
Refrigerate.
Refrigerate.

Just before serving, I sprinkled with a bit of seasoned salt that was given to us as part of a Christmas gift.
Serve with crackers.

Whole Milk Ricotta Cheese1 gallon whole milk
1 quart buttermilk
salt, to tasteIn a large pot, stir to combine the milk & buttermilk. Continue to stir occasionally while slowly heating the milk to 180-185 degrees. Stirring too often will cause the curds to become to small.Once the milk is to temperature, remove from the heat and allow the curds & whey to sit undisturbed for 30 minutes.Line a colander with cheesecloth- a double layer of coarse or single layer of fine butter muslin. Gently pour the curds into the cheesecloth-lined colander. Tie up the corners and hang for about 30-45 minutes, but begin checking at 20 minutes until you reach the desired consistency. I like mine after 20-30 minutes.Place the curds in a bowl, tossing with salt to taste. If you drained the cheese for too long, you could always add some cream to achieve the desired consistency. It just makes it all the more delicious. Store in the refrigerator for a week.
Recipe Credit: The Complete Guide to Making Cheese, Butter, and Yogurt at Home


30 Minute Mozzerella: Picture Tutorial:
Add 1 & 1/2 tsp. Citric Acid diluted in 1cup cool water to 1 gallon of cold milk. Heat slowly to 90Fpar Remove pot from burner slowly stir 1/4 tab or 1/4tsp of rennet diluted in 1/4cup. cool water for 30sec. Cover and leave for 5 minutes. Check the curd, it will look like custard and the whey will be clear. If too soft let set a few more minutes.
1 inch squares with a knife that reaches the bottom of the pot.Place pot back on stove and heat to 105F while stirring slowly. (If you will be stretching in water heat to 110F) Drain the whey from the curd while gently pressing to aid whey runoff.
knead the curd as you would bread doughRemove curd from bowl and continue kneading, return it to the microwave if needed.
this is what makes it Mozzarella.I hope we’re having fun now. Ooops !
they call her the
————————–
“CHEESE QUEEN”


Written Tutorial:
How to make this cheese :
The Milk:Make sure the milk you use for this cheese is NOT
ULTRA- PASTEURIZED
–Homogenized milk will work fine.
–Fresh farm milk will also work well but we encourage you to try with 1 gallon of store bought whole milk first.
–Low fat milk will work but the cheese will be drier and less flavorfulYou will need:
–A 6 to 8 quart stainless steel pot. Aluminum or cast iron will not work.
–A stainless steel or strong plastic slotted spoon.
–A two quart microwave safe mixing bowl
–measuring spoons
–A thermometer which will clearly read between 80 – 120 degrees F.Prepare your work area:Do not prepare any other food while you are making cheese.
Put all food products away.
Move all sponges, cloths and dirty towels away from your work surface, wipe your sink and stove with soap and water.
Finally use your antibacterial cleaner to wipe down all surfaces.Process:
Crush 1/4 tablet of rennet and dissolve in 1/4 cup of cool, unchlorinated water and set aside to use later.Add 1.5 tsp. of citric acid, diluted in 1 cup cool water, to 1 gallon of cold milk and stir well.(Add the citric acid solution to the empty cold pot – the photos show adding this dry but do mix with water).Next, microwave the curd on HI for 1 minute. You will notice more whey has run out of the curd. Drain off all whey as you did before. Quickly work the cheese with a spoon or your hands until it is cool enough to touch (rubber gloves will help since the cheese is almost too hot to touch at this point.)Microwave 2 more times for 35 seconds each, and repeat the kneading as in the last step. Drain off all of the whey as you go.
Knead quickly now as you would bread dough until it is smooth and shiny. Add salt near the finish.At this point the cheese should be soft and pliable enough to stretch like taffy. It is ready to eat when it cools.
Form it into a ball and drop into ice water to cool and refrigerate.
When cold you can wrap in plastic wrap and it will last for several days, but is best when eaten fresh.Option:
–A substitution of reconstituted dry milk powder and cream is a great option if you can not find the right type of milk
–Lipase may be added to the milk to provide a typical italian cheese flavor
–If you want a softer texture, do not let the curd set as firm and work less when draining and kneading, this will make a moister cheese.
 Provolone is the older brother of the Mozzarella family. It is the moisture levels that differentiate the two cheeses. Provolones 45 percent moisture content is lower than Mozzarellas standard range of 52 to 60 percent moisture. This lower moisture content gives Provolone a longer shelf-life than Mozzarella and the Provolone holds up better as a slicing and shredding cheese. Provolone is the older brother of the Mozzarella family. It is the moisture levels that differentiate the two cheeses. Provolones 45 percent moisture content is lower than Mozzarellas standard range of 52 to 60 percent moisture. This lower moisture content gives Provolone a longer shelf-life than Mozzarella and the Provolone holds up better as a slicing and shredding cheese.This low moisture and longer aging results in fuller flavors than Mozzarella.The stretching of the curd during production results is a malleable cheese but close textured cheese that can be sculpted into a variety of shapes, depending on desired function or the whim of the cheese maker. They sometimes even form it in the shape of animals.  Provolones original shape was round, but with the invention of molds in the early 1900s, the salami shape became most popular because of its practicality for hanging and slicing. Many companies continue to hang and age their Provolone using ropes, a throwback to traditional practices. (It was always hung with ropes because it is too soft to sit on a shelf.) Provolones original shape was round, but with the invention of molds in the early 1900s, the salami shape became most popular because of its practicality for hanging and slicing. Many companies continue to hang and age their Provolone using ropes, a throwback to traditional practices. (It was always hung with ropes because it is too soft to sit on a shelf.) | ||||||||||||||||||||||||||||||||||||||||||||||||||||||||||||||||||||||||||||||||||||||||||||||||||||||||||||||||||||||||||||||
 P P rovolone today is made in larger sizes and it still involves a lot of hand work, as evidenced in these photos. rovolone today is made in larger sizes and it still involves a lot of hand work, as evidenced in these photos. | ||||||||||||||||||||||||||||||||||||||||||||||||||||||||||||||||||||||||||||||||||||||||||||||||||||||||||||||||||||||||||||||
The cheese I have made to demonstrate the Provolone process here is one for a longer aging to develop a higher flavor over time.
Although I have used 6 gallons of milk here I have scaled the recipe below for a 3 gallon batch size to make it a little more manageable in the home kitchen. To increase the batch size, simply increase all ingredients proportionately.I have not used any Lipase in this recipe because it seems to produce a flavor I do not like in aged cheese, as it breaks down the fat in a full fat milk to a rancid flavor. The Lipase is of course an option and can be added for those who like it.
A simple Jack Cheese

Ricki ‘The Cheese Queen’ makes a very simple
No Fuss No MussCheese in the kitchenr
this is about as simple a cheese as you, the home cheese maker can make in your very own kitchen
it requires no forms, no press, and about as little effort as a cheese can be. Some milk, a pot, a piece of porous cloth, a couple of boards and a rock.
| ||||||||||||||||||||||||||||||||||||||||||||||||||||||||||||||||||||||||||||||||||||||||||||||||||||||||||||||||||||||||||||||

 is an Italian stretched-curd (pasta filata) cheese, first made in southern Italy but now also made in other parts of Italy and in the United States, principally in Wisconsin and Michigan. It is light in color, mellow, smooth, cuts without crumbling, and has an agreeable flavor.


Gouda originated in the south of Holland in the town of the same name but is today produced by many countries around the world.
 T T he only name protection is “Noord-Hollandse Gouda” which is registered in the EU as a Protected Geographical Status. The north is currently the premium pasture land reclaimed from the sea and producing exceptional milk for this cheese.In addition to the young, farm, and aged versions this cheese can be varied with smoke and spice additions such as nettle, pepper, mustard, clove, cumin, caraway, mixed spices and fenugreek. Today we also find some washed with beer and (although not a traditional Gouda) made with propionic cultures to create a sweeter cheese with holes similar to an Alpine cheese.A he only name protection is “Noord-Hollandse Gouda” which is registered in the EU as a Protected Geographical Status. The north is currently the premium pasture land reclaimed from the sea and producing exceptional milk for this cheese.In addition to the young, farm, and aged versions this cheese can be varied with smoke and spice additions such as nettle, pepper, mustard, clove, cumin, caraway, mixed spices and fenugreek. Today we also find some washed with beer and (although not a traditional Gouda) made with propionic cultures to create a sweeter cheese with holes similar to an Alpine cheese.A similar cheese to Gouda is the Edam cheese made in Holland. It is made quite like the Gouda but with a lower fat milk.The distinguishing characteristic of Gouda cheese is that it is a relatively sweet cheese. This is accomplished by removing some of the milk sugars early in the process to keep excess acid from being produced by the bacteria culture. Shortly after the milk has formed a curd and been cut, about 1/3 of the whey is removed and replaced with hot water to heat the curd.The reason for this goes back to the days of the wooden vats in which the cheese was made. These vats could not be heated so hot water was added to increase the temperature of the curds and release more whey from the curds. similar cheese to Gouda is the Edam cheese made in Holland. It is made quite like the Gouda but with a lower fat milk.The distinguishing characteristic of Gouda cheese is that it is a relatively sweet cheese. This is accomplished by removing some of the milk sugars early in the process to keep excess acid from being produced by the bacteria culture. Shortly after the milk has formed a curd and been cut, about 1/3 of the whey is removed and replaced with hot water to heat the curd.The reason for this goes back to the days of the wooden vats in which the cheese was made. These vats could not be heated so hot water was added to increase the temperature of the curds and release more whey from the curds. | ||||||||||||||||||||||||||||||||||||||||||||||||||||||||||||||||||||
 | ||||||||||||||||||||||||||||||||||||||||||||||||||||||||||||||||||||
Making the Cheese:Choosing the milk:
Begin with 6 gallons of whole full fat milk. This can either be pasteurized milk or raw milk. If using raw milk the milk must be of highest quality because The low acid of this cheese will not protect against late fermentation from unwanted bacteria during aging. In Holland a nitrate is added but not allowed here in the US.Acidifying and heating the milk: Heat the milk to 86F Add 1/2 tsp MM100 culture and ripen for 30 min.Coagulation with rennet: Add 10 ml single strength rennet. At 13 minutes the milk will begin to thicken but allow the curd to develop 40 min. from time of rennet addition or until a very firm curd develops.Cutting curds and releasing the whey:  Check curd for firmness and then cut. Check curd for firmness and then cut.Note: with full fat milk I make a precut of the curds cutting crosswise about 1  inch squares and allow the curds to firm for about 2-3 min. before I continue my final cutting to 1/2 – 3/8 inch pieces in 5 minutes. This will help avoid losing more fat as you cut the curds smaller.Now slowly and gently stir the curds for 15 min.Remove 1/3 of the whey, then add water at 130 F over 15 min. for a final temp of 98-102. (Higher temp for drier longer aging cheese). This is a very important step since it also removes some of the lactose or milk sugars which can be converted to acid by the lactic bacteria. inch squares and allow the curds to firm for about 2-3 min. before I continue my final cutting to 1/2 – 3/8 inch pieces in 5 minutes. This will help avoid losing more fat as you cut the curds smaller.Now slowly and gently stir the curds for 15 min.Remove 1/3 of the whey, then add water at 130 F over 15 min. for a final temp of 98-102. (Higher temp for drier longer aging cheese). This is a very important step since it also removes some of the lactose or milk sugars which can be converted to acid by the lactic bacteria.
Continue stirring gently to keep from matting for 30 minutes or until final moisture is reached according to the desired aging requirements (longer stirring = drier curds = longer aging).
 Forming the Cheese:Mold filling is initially done under the whey to insure a tight curd mass with fewer mechanical holes.Prepare molds and draining cloth and place into a pan large enough to retain whey.Then pour free whey into the molds to warm them. Fill molds, allowing whey to rise 1-2rdblquote over top of curds. Forming the Cheese:Mold filling is initially done under the whey to insure a tight curd mass with fewer mechanical holes.Prepare molds and draining cloth and place into a pan large enough to retain whey.Then pour free whey into the molds to warm them. Fill molds, allowing whey to rise 1-2rdblquote over top of curds.Add the follower plus 6 lbs of weight on top (approx 1 lb. of weight per lb. of final cheese yield) then allow this to consolidate the curds for 15 min.
 Press Details Press Details
SaltingNext morning place the cheese in saturated brine for 18 – 24hrs (3-4 hrs per lb. of final yield).
Remove from brine Wax or prepare natural rinds when cheese is dry to touch (3-7 days).  Traditionally the Boerenkaas was a natural rind cheese. The barns were cleaned out in the spring when the cows went on pasture for the summer and the cheese was aged on shelves where the cows had been. The rinds were simply kept clean by brushing and turning on a regular basis.Aging Traditionally the Boerenkaas was a natural rind cheese. The barns were cleaned out in the spring when the cows went on pasture for the summer and the cheese was aged on shelves where the cows had been. The rinds were simply kept clean by brushing and turning on a regular basis.Aging For aging requirements targets are 56-64F … 80-85% RH For aging requirements targets are 56-64F … 80-85% RHSome small internal holes may develop during aging. The higher the temperature during drying and aging, the greater chances for the eye development. The cheese will be ripe in 60 days to 6 months. For drier cheeses 12 months to 4+ years.
| ||||||||||||||||||||||||||||||||||||||||||||||||||||||||||||||||||||
| ||||||||||||||||||||||||||||||||||||||||||||||||||||||||||||||||||||


Make a Cream Cheese
The recipe for this month will be another simple cheese to make in the kitchen. However, when I began researching this one in more detail I found a lot about this cheese that I did not know before.
 Cream cheese is similar to Neufchatel from France except that cream cheese has more butterfat – starting with a fat enriched milk of about 7-10%. When this has ripened and the whey drained, the final cheese will have a much higher butterfat content, depending on its final moisture.Cream cheese also has a fresh acidity, due to the dairy bacteria converting lactose to lactic acid. This helps to balance the rich flavors from the cream.However, if you are looking for a lighter cheese then you can easily make a leaner cheese by using less cream or a lower butterfat % cream (see my cream content chart here).Lowering the fat content of the cream too much tends increasingly to cause grainy texture and crumbly body, while increasing the fat content excessively tends to cause excessive smoothness and stickiness.Cream
 cheese was originally produced in the US in New York State during the late 1800s. It originally acquired its association with Philadelphia, not because it was made there but because at that time Phillie was known as the home of top quality food.In the commercial process, because cream cheese has a higher fat content than other cheeses, and fat repels water, which tends to separate from the cheese, stabilizers such as guar, xanthan gum, and carob gums are added to prolong its shelf life. The commercial version tends to be essentially an industrial concoction of milk, enough cream to claim it’s there and all sorts of gums and stabilizers to make it appear like what it isn’t.Here is an ingredient list from the industry standard Philadelphia Brand Cream Cheese: Pasteurized Nonfat Milk, and Milkfat, Cheese Culture, Salt, Stabilizers (Xanthan Gum, and/or Carob Bean Gum, and/or Guar Gum).It is also cooked to much higher temperatures commercially to speed the process up. This is good for the producer’s cash flow but not so good for the final product.Because we try to keep these additions from our food sources here, our process will not include anything but great milk and cream, a traditional dairy culture and a few drops of rennet.You will also find in the process instructions a rough guide for ripening and draining time, but more importantly, I have provided descriptions and visual cues to:
- Accommodate the differences in milk quality as well as milk/cream content
- Allow you to produce exactly the style of cream cheese you want
A recipe for making your own cream cheese ….. | ||||||||||||||||
…In the style that best suits your taste.
| ||||||||||||||||
Before you begin:
You will need:
Note: You can cut this recipe in half by using 1/2 of all ingredients.
Everything needs to be clean and sanitized.
| ||||||||||||||||
About the milk:
The
 milk I have chosen to use here is a local milk, but it is also one of the milks that has been pasteurized at higher than normal temperatures (172F as opposed to 161F).I have selected this to use here because this is a milk that is becoming more and more common on store shelves. milk I have chosen to use here is a local milk, but it is also one of the milks that has been pasteurized at higher than normal temperatures (172F as opposed to 161F).I have selected this to use here because this is a milk that is becoming more and more common on store shelves. As you will see in the following photos this does form a very wonderful cream cheese with super flavor and texture.The cream is ultra-pasteurized, as you can see by the label here. This is not a problem, though, because the cream portion is just for the butterfat. As you will see in the following photos this does form a very wonderful cream cheese with super flavor and texture.The cream is ultra-pasteurized, as you can see by the label here. This is not a problem, though, because the cream portion is just for the butterfat. The milk portion will provide the proteins for curd formation and should not be ultra-pasteurized.Some of our customers have tried using just half and half for their cream cheese but this often tends to be ultra-pasteurized and will not form a good solid curd since all of the proteins have been damaged in the process. If you do find half and half that is not ultra-pasteurized, that will work for a very rich cheese since it has a higher fat content than the recipe I provide. This may also be more difficult to drain since the butterfat holds the moisture.NOTE: The milk portion will provide the proteins for curd formation and should not be ultra-pasteurized.Some of our customers have tried using just half and half for their cream cheese but this often tends to be ultra-pasteurized and will not form a good solid curd since all of the proteins have been damaged in the process. If you do find half and half that is not ultra-pasteurized, that will work for a very rich cheese since it has a higher fat content than the recipe I provide. This may also be more difficult to drain since the butterfat holds the moisture.NOTE:If you do have access to raw milk, you will find that you may need to use less culture and that your ripening times are less. Your curd may also be firmer and you may find that the cheese drains faster. If you pay attention to the ripening and draining cues in the following process, you should be well on track to making a great cheese from your raw milk. | ||||||||||||||||
If you care to make up a different milk/fat ratio, this table may help
| ||||||||||||||||
Getting started:Pour t
 he milk into your pot and slowly heat to 86F. Many recipes for this cheese suggest starting at room temperature, but the culture works best at 86F and I prefer to start it there. Happy culture always makes a better cheese. It is OK to allow the temperature to drop to room temperature over time. he milk into your pot and slowly heat to 86F. Many recipes for this cheese suggest starting at room temperature, but the culture works best at 86F and I prefer to start it there. Happy culture always makes a better cheese. It is OK to allow the temperature to drop to room temperature over time.
  | ||||||||||||||||
Initial ripening:
 Cover the pot and set aside for ripening. The milk now needs to sit quiet for 12-24 hours while the culture works and the rennet coagulates the curd. It is OK if the temperature drops to a temperature of 68-72F. The thermal mass of this milk should keep it warm for a while though.This is where your natural flavor is developed from the complex strains of lactic bacteria as they convert the milk sugars (lactose) to lactic acid. These cultures will produce a buttery flavored compound (Diacetyl) which is a natural byproduct of fermentation. Also a small amount of tiny gas holes (CO2) will be formed causing a lighter texture in the final cheese. Cover the pot and set aside for ripening. The milk now needs to sit quiet for 12-24 hours while the culture works and the rennet coagulates the curd. It is OK if the temperature drops to a temperature of 68-72F. The thermal mass of this milk should keep it warm for a while though.This is where your natural flavor is developed from the complex strains of lactic bacteria as they convert the milk sugars (lactose) to lactic acid. These cultures will produce a buttery flavored compound (Diacetyl) which is a natural byproduct of fermentation. Also a small amount of tiny gas holes (CO2) will be formed causing a lighter texture in the final cheese.Note- Our C101 or MA011 cultures will not provide the added flavor from their ripening strains nor the lighter texture.The higher process temperatures and thickener additions of commercial producers are needed for their shorter process and do not allow the use of this longer beneficial ripening time (this is the flavor development time).Ripening may take 12-24 hours depending on the milk quality and room temperature. My conditions here show this ripening phase in about 14-16 hours but you should watch for the proper ripening of your own milk. I encourage you to watch for this final ripening phase as described below.This  final ripening can be determined visually because when the proper amount of acid has been produced, you will notice first small droplets of whey forming on the surface, then these will collect as small pools and then finally a thin layer of whey will cover the entire surface.I usually determine the readiness by watching for small pools about 2-3rdblquote in size. You may also see the curd mass pull slightly away from the sides of the pot. final ripening can be determined visually because when the proper amount of acid has been produced, you will notice first small droplets of whey forming on the surface, then these will collect as small pools and then finally a thin layer of whey will cover the entire surface.I usually determine the readiness by watching for small pools about 2-3rdblquote in size. You may also see the curd mass pull slightly away from the sides of the pot. 
If you have a pH meter, the proper ripe state will measure about 5.1-4.9 pH or a titrateable acidity of .5% but there is no need to get that technical here.Too long a ripening may result in an over acid cheese.Some acid production will continue during the draining stage so expect a bit more acid flavor while the whey drains off.Too short a time may result in a weak curd that may be hard to drain and may even run off through the cloth. Make sure the curd holds a good clean break when cut before transferring to the cloth for draining.
| ||||||||||||||||
Now for the draining
Once the final ripening of the milk has been reached, the curd mass should now be firm enough to be transferred with a slotted spoon to the draining cloth.  Prepare a sanitized colander. You need either 1 large or 2 medium sized since this will be a lot of curd to be drained. Line this with a double layer of the butter muslin. Make sure you have a container to collect the whey in. This can be used for cooking, drinking, etc. but not for making ricotta due to high acid.Transfer the curd to the cloth for draining (be careful since this is quite fragile at this point and may break) Prepare a sanitized colander. You need either 1 large or 2 medium sized since this will be a lot of curd to be drained. Line this with a double layer of the butter muslin. Make sure you have a container to collect the whey in. This can be used for cooking, drinking, etc. but not for making ricotta due to high acid.Transfer the curd to the cloth for draining (be careful since this is quite fragile at this point and may break) | ||||||||||||||||
   | ||||||||||||||||
Allow this to drain for 1-2 hours to release much of the whey- then pull all 4 corners of the cloth up and tie off with a string. Hang this in an area 68-74F to drain into a pot or sink for another 10-20 hours.    | ||||||||||||||||
During the draining time you should open the cloth every 3-4 hours and scrape the curd from the cloth- mixing the curds to encourage better whey drainage. If your schedule does not permit this it may just take longer to drain.
Also, at the last mixing of the curds 1 tsp. salt can be added for flavor and to encourage the final whey release.
     
The final draining time will depend on your preference for texture. The longer it drains, the drier and stiffer (less spreadable) the final cheese. I drain mine here about 16-20 hours for a nice firm cream cheese but still quite spreadable.
If you find your cream cheese with too much moisture, then simply drain it a bit longer next time. Remember that warmer draining temperatures will drain moisture more quickly. Also, the rate of draining will depend on different milk qualities and higher fat milks will drain more slowly.
    
Finishing the cream cheese:
When the cheese has reached its final consistency, you can then use a spoon to blend it well in a bowl for a more homogenous cheese. This would be the time to add any herbs, spices, etc. and to adjust the salt to your taste. You may even use fresh herbs in this because it should all be eaten fresh within a few days.   I transfer mine to small clean and sanitized plastic tubs with lids and store at fridge temps. Freshness is never a problem here because it’s gone in just a few days. You should easily get 8-10 days or even more of storage for this cheese. I transfer mine to small clean and sanitized plastic tubs with lids and store at fridge temps. Freshness is never a problem here because it’s gone in just a few days. You should easily get 8-10 days or even more of storage for this cheese.  My yield is normally about 1.5-2 pints of cream cheese from the original 5 pints of milk/cream. My yield is normally about 1.5-2 pints of cream cheese from the original 5 pints of milk/cream.  Tips:
| ||||||||||||||||
Enjoy your new adventure in cheese making.
  | ||||||||||||||||

Cottage Cheese was typically made as a low f
 at or skimmed milk cheese but with the more modern addition of cream following the final curd production it may have a butterfat of 4% or higher. at or skimmed milk cheese but with the more modern addition of cream following the final curd production it may have a butterfat of 4% or higher.A low fat version of .5-2% butterfat as well as a dry curd Cottage Cheese with less than .5% butterfat can still be found.Cottage Cheese can be commonly mixed or served with fruit and herbs as a base for salads and snacks. | |||||||||||||||||||||||
A Bit of History
Cottage Cheese has a long history and because of this it has evolved into a variety of styles. It was originally made on the farm from the family cow(s). It was often made from older milk in which the natural bacteria had already started to work.  The milk would be brought in and placed in a warm place (near the fire, behind the wood stove, or in the warming oven). Then after a day or so the natural bacteria would produce enough acid to cause the milk to form a curd. This was then cut, cooked to a dry curd, then washed with cold water. The finish was a cold dry curd with a tangy flavor. At some point someone realized that the taste improved with the addition of some cream to make the much richer tasting creamed cottage cheese. The milk would be brought in and placed in a warm place (near the fire, behind the wood stove, or in the warming oven). Then after a day or so the natural bacteria would produce enough acid to cause the milk to form a curd. This was then cut, cooked to a dry curd, then washed with cold water. The finish was a cold dry curd with a tangy flavor. At some point someone realized that the taste improved with the addition of some cream to make the much richer tasting creamed cottage cheese. In the days when farmers brought their milk to the cheese dairies by horse and wagon, the process was sometimes slow and the milk was not very fresh, especially in warmer weather. By the time this milk arrived at the dairy, the milk had already developed too much acidity to make a good cheese such as Cheddar and the only use for this already acidified milk was to make Cottage Cheese. In the days when farmers brought their milk to the cheese dairies by horse and wagon, the process was sometimes slow and the milk was not very fresh, especially in warmer weather. By the time this milk arrived at the dairy, the milk had already developed too much acidity to make a good cheese such as Cheddar and the only use for this already acidified milk was to make Cottage Cheese.Process Essentials
The primary process in making Cottage Cheese involves good dairy bacteria converting lactose to lactic acid. This lactose (or milk sugar) is an important component in our milk but unless
 it is converted by a good quality dairy bacteria, some off flavors or worse may result. it is converted by a good quality dairy bacteria, some off flavors or worse may result.
Several hours after the bacteria culture activity begins, the milk acidity increases to the extent that the milk coagulates into a solid gel which can be cut into small curds. This resulting curd is then cooked until the moisture is released and a dry curd is formed. Then this curd is chilled to the final cottage cheese as we know it. A final optional cream dressing may also be added to increase the richness and texture and this then becomes the Creamed Cottage Cheese.
Different Styles of Cottage Cheese
| |||||||||||||||||||||||
 | |||||||||||||||||||||||


A Recipe for making Colby |
For this months recipe Jim will be using a homogenized milk that has been pasteurized to the higher end of the useable milk spectrum.  This milk is heated past the defined 161F pasteurization temperature to 180F. This milk is heated past the defined 161F pasteurization temperature to 180F.Although we normally do not use this type of milk, Ricki loves it when we do use this milk because it shows how a good cheese can be made from even marginal milks.Jim will also be steering away from the “modern” Colby process towards a more “traditional” process that should produce a cheese that can be differentiated from a young cheddar. It will be moister, more elastic, and have a fresher flavor that is less acid with focus on the good quality of the milk.Jim’s inspiration for this was an old transcript he discovered from the early 1900’s documenting the details of the original Colby making process by 2 well known Colby makers of the time.This we think will bring your Colby into its own with a unique flavor/texture in a young cheese and not just a “modified” Cheddar. Hopefully one that you will do again and again. |
Before you Begin:
You will need:
 2 gallon of milk (Not UltraPasturized) 2 gallon of milk (Not UltraPasturized)1/2 packet of our C101 culture (see below on how to do this) Calcium Chloride if using pasteurized cold stored milk Annatto for color (1/4 tsp .. optional) Liquid Rennet ( 1/2 tsp / 2.5 ml) Salt for brine (make this up in advance with the info found here) A good thermometer A knife to cut the curds, and a spoon or ladle to stir the curds with. Molds SmallMold-M3 or Stainless-6inch A colander and butter muslin to drain the curds A Cheese Press or weights to apply sufficient weight for consolidation of the curds.
Everything needs to be clean and sanitized.
|
Heating and Acidifying the milk:
 Begin by heating the milk to 86F (30C). You do this by placing the milk in a pot or sink of very warm water. If you do this in a pot on the stove make sure you heat the milk slowly and stir it well as it heats.Next the CaCl and Annatto can be added before adding the culture.  Make sure you rinse the spoon well after adding the CaCl since any residuals of this will cause the Annatto to precipitate into dark spots that will show up in the finished cheese. Better yet add the Annatto first and stir it in well before adding the CaCl Make sure you rinse the spoon well after adding the CaCl since any residuals of this will cause the Annatto to precipitate into dark spots that will show up in the finished cheese. Better yet add the Annatto first and stir it in well before adding the CaClThe Annatto is only needed to offset the snow white color of winter or pasteurized milk. The Colby was traditionally an orange cheese but I like just a medium warm color for mine here, which the 1/4 tsp will give. I add no Annatto to my fresh raw milk in the summer because it naturally has that nice warm glow from what the cows eat.Only 1/2 pack of culture will be used for this cheese because we want a sweeter cheese with slow acid development and the smaller amount of culture should do this. Do this by:
   Once the milk is at 86F the culture can be added. To prevent the powder from caking and sinking in clumps sprinkle the powder over the surface of the milk and then allow about 2 minutes for the powder to re-hydrate before stirring it in. Then allow the milk to rest for 1 hour while the culture wakes up and begins doing its work. Once the milk is at 86F the culture can be added. To prevent the powder from caking and sinking in clumps sprinkle the powder over the surface of the milk and then allow about 2 minutes for the powder to re-hydrate before stirring it in. Then allow the milk to rest for 1 hour while the culture wakes up and begins doing its work. |
Coagulation with rennet:
 Then add about 1/2 tsp or 2.5ml of single strength liquid rennet.The milk now needs to sit quiet for 45 minutes while the culture works and the rennet coagulates the curd . The thermal mass of this milk should keep it warm during this period. It is OK if the temp drops a few degrees during this time.At about 15 minutes you should notice the milk beginning to firm up. Allow it to remain quiet for another half hour for a curd ready to cut. This will be a total of 45 minutes from rennet addition to cut. Then add about 1/2 tsp or 2.5ml of single strength liquid rennet.The milk now needs to sit quiet for 45 minutes while the culture works and the rennet coagulates the curd . The thermal mass of this milk should keep it warm during this period. It is OK if the temp drops a few degrees during this time.At about 15 minutes you should notice the milk beginning to firm up. Allow it to remain quiet for another half hour for a curd ready to cut. This will be a total of 45 minutes from rennet addition to cut.If your curd does not seem firm enough then allow it to rest another 10 minutes before cutting. |
 ……… ………  |
Cutting curds and releasing the whey:  The curd is ready to cut when it shows a nice clean even break when lifting with the flat of the cutting knife and then a clean whey in the opening that is neither to milky (cut too soon) or too clear (cut too late). The curd is ready to cut when it shows a nice clean even break when lifting with the flat of the cutting knife and then a clean whey in the opening that is neither to milky (cut too soon) or too clear (cut too late).
The curd can be cut to 1/2″ cubes by first cutting the 1/2″ vertical cuts as shown below and then using the ladle or spoon to break these into 1/2″ pieces as uniformly as possible.
 
I have found when using the higher temperature pasteurized milk like I am using here that the curds do tend to shatter into smaller pieces much more easily. The key is to go slow and gentle in the cutting and stirring at first. If using a fresher milk or one pasteurized at lower temperature, You will find it less of a problem.
|
Cooking the curds :
Now it is time to begin drying out the curds. This will be done by increasing the heat slowly to 102F . The heat needs to be increased slowly.
 The total cooking time will be 30 minutes. The curds can then be gently stirred while holding at the final temperature for another 15-30 minutes if the curds are still soft. The total cooking time will be 30 minutes. The curds can then be gently stirred while holding at the final temperature for another 15-30 minutes if the curds are still soft.
The final curds should be cooked well through and should be examined to make sure that enough moisture has been removed. A broken curd should be firm throughout and the curds should have a moderate resistance when pressed between the fingers. This is a fairly subjective test (depending on how firm/soft you want the final cheese.)
When this point is reached the curds can be allowed to settle under the whey.
The time spent so far is about 2.5-3 hrs. |
Washing the curds:
This is one of the key parts in making this cheese a real Colby cheese.
The curds are now resting on the bottom of the pot at 102F with only a moderate amount of lactose converted to lactic acid. In other words a very sweet cheese curd.
If left in this condition, the lactose (milk sugar) will act as a food source for the bacteria and the result will be a higher acid curd which dries the curd out as the acid develops. The bacteria will also be very happy working at this temperature as well.
We plan to alter this situation by:
In Addition the cold water will begin to increase the moisture of the curd. If the water temperature is lower that the curd temperature the curd moisture increases. If it is higher than the curd temperature it will decrease the moisture (this is how Gouda is made).
   
 
At this point the process has taken about 3.5-4 hrs and we are ready for the final stage of molding and pressing.
|
Final Draining and Molding:
|
Pressing:The curds in the form are now still quite wet and heavy pressure early on may lock this moisture in the final cheese. Even though we have slowed down the conversion of lactose to lactic acid, we are still producing acid and will continue this during the final pressing. This means that the cheese will continue to release moisture through the pressing as a bit more acid is present.
 So, for pressing we should begin very light and slowly increase the press weight to a moderate level: So, for pressing we should begin very light and slowly increase the press weight to a moderate level:
Notice in the center photo below the rate of whey running off is simply a matter of drops and not a stream of whey being released. This is a good rate of whey removal during pressing which will slow even more as the residual free moisture is released. The form should show tears of whey weeping from the form very slowly. When this stops you can increase the weight slightly. The cheese should be removed from the press, unwrapped, turned, rewrapped and put back to the press at each of the above intervals. To assure an even consolidation. At each turn you will notice the cheese has formed a smoother surface and rests lower in the mold.
   The next morning the cheese can be removed from the mold and cloth. The next morning the cheese can be removed from the mold and cloth.Finally the pressing is finished and you should have a nicely consolidated wheel of cheese with no surface openings. This should still feel quite springy and elastic with mild hand pressure still. The surface should not feel at all sticky at this point |
Salting: You should have a saturated brine prepared for salting this cheese. You should have a saturated brine prepared for salting this cheese.You will find all of the details you need on brining here. A simple brine formula is: 1 Gallon of water to which is added 2.25 Lbs of Salt, 1tbs. Calcium Chloride (30% solution), and 1 tsp. white vinegar. The cheese now needs to be set in the brine for about 8 hours. The cheese will float above the brine surface so sprinkle another teaspoon or 2 of salt on the top surface of the cheese. Flip the cheese and resalt the surface about half way through the brine period.
At the end of the brine bath, wipe the surface and allow the cheese to surface dry for a day or two before waxing. The surface will darken somewhat during this time.
|
Aging:
The cheese can then be placed into your aging space at 52-56F and 80-85% moisture.
The cheese can now be aged for 4-6 weeks and it will ready for your table. |
   |


Fromage Blanc:
Before you Begin:
 You will need:1 gallon of whole or skim milk (Not UltraPasturized) You will need:1 gallon of whole or skim milk (Not UltraPasturized)plus a good stainless pot to hold the milk with a cover 1 packet of our Fromage Blanc culture (this also contains the pre-measured rennet). Many of our German customers also use this with skim milk for making their Quark and love the results Ricki often substitutes the C31 Fromagina culture which has a bit less rennet for this one. A good thermometer could be a help A knife to cut the curds, and a spoon or ladle to transfer the curds with. Optional herbs, fruit, etc plus a bit of salt to your taste A colander and butter muslin to drain the curdsEverything needs to be clean and sanitized. Now lets make Fromage Blanc:
Converting the milk
Heat your 1 gallon of milk to 86F while stirring slowly. You can use a thermometer but this is so close to our body temperature that when the milk feels neither cool nor warm it is close enough.
Once it reaches this temperature you will open the packet of our Fromage Blanc culture and sprinkling it on the milk surface waiting 1 minute and then stirring it into the milk for a couple of minutes. This starter culture contains bacteria and rennet.  Next, allow the milk to sit quietly on the counter at room temperature 68-74F for 12-14 hours. The milk will drop in temperature during this time to that of the room. During the winter it would best to keep the pot covered with towels or a blanket to keep from getting cool. The best time to do this is in the evening because the curds will be ready to drain in the morning and can be draining while you are busy doing other things or at work. Next, allow the milk to sit quietly on the counter at room temperature 68-74F for 12-14 hours. The milk will drop in temperature during this time to that of the room. During the winter it would best to keep the pot covered with towels or a blanket to keep from getting cool. The best time to do this is in the evening because the curds will be ready to drain in the morning and can be draining while you are busy doing other things or at work.
During this time the bacteria in the culture converts the milk sugar (lactose) into lactic acid which gives the cheese its flavor and increases the acidity of the milk.
 The rennet coagulates the milk. The milk will coagulate into a gel after a few hours. When this solidified mass shrinks slightly, visibly pulling away from the edges of the container, the coagulation is sufficient. The Fromage Blanc at this point will look like a block of curd floating in clear whey. The rennet coagulates the milk. The milk will coagulate into a gel after a few hours. When this solidified mass shrinks slightly, visibly pulling away from the edges of the container, the coagulation is sufficient. The Fromage Blanc at this point will look like a block of curd floating in clear whey.
Separating the Whey
 Our next task will be to separate the solids (Curds soon to become cheese) and liquid called whey. Our next task will be to separate the solids (Curds soon to become cheese) and liquid called whey. We will begin by lining our sanitized colander with the cheese cloth in preparation for draining. If you would like to save the whey for cooking or other uses simply drain it all into another pot.
You are now ready to transfer the curds to the draining cloth. Note the firmness of the curd in the photos below. Simply ladle the curds into the cloth and allow the whey to drain off
  
Note the clear whey that is forming below as the curds are cut and ladled. This is our next objective to remove enough of this moisture for the cheese we would like.
 
Once the curd is transferred you can bring the corners of the draining
 cloth together and tie them off. It should then be hung for several hours to allow the whey to drain off. This can take from 3-12 hours depending on the final moisture desired.This is usually done at room temperature of 65-74F since lower temperature will slow the draining process and higher temperatures will cause faster draining and a drier cheese.You may find that you need to open the cloth and scrape the edges to help the draining whey. cloth together and tie them off. It should then be hung for several hours to allow the whey to drain off. This can take from 3-12 hours depending on the final moisture desired.This is usually done at room temperature of 65-74F since lower temperature will slow the draining process and higher temperatures will cause faster draining and a drier cheese.You may find that you need to open the cloth and scrape the edges to help the draining whey. | |
The Final Cheese
The final curd that forms is totally in your control. Simply allow it to drain until you have the consistency you like. The photos below will make a drier spreadable cheese when mixed with herbs.
  | |
  The fresh curds are now ready to use. Add a bit of salt to taste and blend it in well until the texture is consistent. The fresh curds are now ready to use. Add a bit of salt to taste and blend it in well until the texture is consistent.Since this cheese is fresh and will be consumed within a short time, fresh herbs, spices, chiles, nuts, fruit, etc. can be added at this point.It is now ready to be eaten directly or packed in a container to be stored in the fridge. It should last for 7-10 days. | |
You are the Cheese Maker — Tips and Tricks:
NOTE: in general this is the SECRET to all good cheese making. Controlling the time and temperature.
As you may have noted in this page so far, I keep mentioning that this cheese can be made to your preference. So what does this mean? This means that you decide on the use for the cheese and make it the way you want.
Do you want a tart cheese to contrast another food element or a sweet one that will merge better with fruit or dessert? Do you want a very moist flowing texture for topping or blending or do you want a dry cheese with a cream cheese like texture? The choice is yours!
Sweet or Tart?
Your control for this is in the temperature you set the cheese at and how long it ripens for. Higher temperatures and longer times mean that more lactose is changed to acid and the result is a more acid flavor. 6 hours will give you a sweeter cheese and the longer 12 hour plus will produce a much more acid flavor. I have begun the ripening in this recipe at 86F because this is the best temperature for this culture to ripen at but others have opted to begin the ripening at room temperature and that is fine. It will just take longer to achieve the same acid level. Lower temperatures than indicated room temperatures may lead to a stalling of the cultures activity. Notice the amount of whey that begins to form on the top of the curd. First a few drops, then small pools, finally the entire surface is covered and the curd begins to pull away from the pot. Taste the curds at these points and get to know the flavors. Remember good cooks taste often!
Dry or Moist?
You can control this by the draining time and temperatures. For a very moist liquidy cheese, less draining time and lower temperature is best. The longer the curds drain and the higher the temperature, the drier the cheese. Too high a temperature and excess time may lead to a very dry chalky cheese texture. Again, watching the process puts you in control. Open the draining cloth and examine the texture/moisture as you go. This is yours to control.
Once you have made a few batches you will know much more about the process and less attention will be needed to achieve the results you are looking for.
Cheese is too firm when the taste is right?We have developed our culture packs with some very specific intents for each product.
Our Fromage Blanc culture C20 is prepared with more rennet than our Creme Fraiche culture C33 so if you are looking for a less firm curd try replacing the C20 with a pack of the C33. | |
How to make yogurt using our “Yogotherm” :
| |||||||||||||||||||||||||||
Drained Yogurt:
“Greek Style” or drained yogurt such as produced by “Fage” is one of the current ‘hot items’ in dairy. It provides a more concentrated yogurt flavor and a rich creamy texture for mixing with fruit, herbs, etc. The other advantage for the lactose intolerant folks is that it reduces the lactose level of yogurt even further than regular yogurt by draining the residual lactose away with the whey.
To make this at home simply spoon your yogurt into a strainer lined with a Butter Muslin cloth and let it drain for several hours until you have achieve the desired thickness. You can use any one of our delicious yogurt cultures to make this.
| |||||||||||||||||||||||||||
 |  |  | |||||||||||||||||||||||||
 |
The yogurt draining is begun by first sanitizing a spoon, strainer, and draining cloth into which you spoon your prepared batch of yogurt .You can now gather the 4 corners of the cloth and hang the yogurt to drain. The longer you drain it and the higher the temperature, the thicker the yogurt will be.
| ||||||||||||||||||||||||||
 |  |  | |||||||||||||||||||||||||
Once the yogurt has achieved the thickness you like, you may then transfer it to a container and refrigerate. If you have collected the whey as shown here, this is a great high protein beverage. You can also use it in cooking and baking.
| |||||||||||||||||||||||||||
Yogurt and Health:
There are many claims to yogurts health benefits especially in the “Probiotic” realm but science is still working the facts out here. Currently “Acidophilus” and “Bifidobacterium” are two cultures that survive in the digestive tract and have positive effects in enhancing immune responses.Lactobacillus bulgaricus and Streptococcus thermophilus do not survive the initial digestion phases particularly well nor reach the gastrointestinal tract in great numbers, but they can improve lactose digestion in some individuals and may help promote a healthy immune system. The combination of these two bacteria will convert a large percentage of milk lactose to lactic acid. Jointly they will convert more than either culture separately. This is primarily why yogurt can be consumed by lactose intolerant individuals. For the extremely lactose intolerant, simply draining the yogurt further (see “Drained Yogurt” above) reduces almost all of the residual lactose which drains off with the whey.
| |||||||||||||||||||||||||||
More Notes on Yogurt:
| |||||||||||||||||||||||||||


Great article on Butter:
Some History of Butter
References to butter date back to as early as the ninth century B.C. in India, but its “real origin” is credited to the nomadic tribes of Asia around 3500 B.C. A picture of a primitive churn is evident in a Sumerian bas-relief dating from around 3500 B.C. One of the first written references to what we know of as butter comes from India in the form of a ninth-century etiquette manual. It suggests that Hindu brides be given milk, honey, and butter on the day of their wedding.  There is also a reference from the Bible in Genesis: There is also a reference from the Bible in Genesis:“He said to Sarah to take three measures of meal and knead it quickly and make cakes upon the hearth; and it is said that he went to the herd and fetched a calf, tender and good, and gave it to be dressed, and he took butter and milk and the calf which he had dressed and set it before them and they did eat” .
And we thought butter was bad for us. Now I dont feel so bad.
 The original process for butter making for the Arabs and Syrians, as we know it, was to use a bag made from goatskin for a churn. The animal was skinned, the skin sewed up tight, with only one small opening where the cream was poured in. The “churn” was then suspended and swung back and forth until the butter separated.Documents from the first century show that butter was shipped from India to ports of the Red Sea.When Julius Caesar invaded England, he found that the inhabitants hid an abundance of milk, from which they made butter, but could not make cheese until they were taught that art by their invaders. The original process for butter making for the Arabs and Syrians, as we know it, was to use a bag made from goatskin for a churn. The animal was skinned, the skin sewed up tight, with only one small opening where the cream was poured in. The “churn” was then suspended and swung back and forth until the butter separated.Documents from the first century show that butter was shipped from India to ports of the Red Sea.When Julius Caesar invaded England, he found that the inhabitants hid an abundance of milk, from which they made butter, but could not make cheese until they were taught that art by their invaders.What is Butter?
Butter is made of butterfat, water, and some milk proteins. Commercial butter is 80- 82 percent milk fat, 16- 17 percent water, and 1- 2 percent milk solids other than fat (sometimes referred to as curd). It may contain salt , added directly to the butter in concentrations of 1 to 2 percent.
 Unsalted butter is often referred to as sweet butter. This should not be confused with sweet creambutter, which may or may not be salted. Reduced-fat, or light, butter at 40% fat … Well, we shall choose not to discuss that here. Unsalted butter is often referred to as sweet butter. This should not be confused with sweet creambutter, which may or may not be salted. Reduced-fat, or light, butter at 40% fat … Well, we shall choose not to discuss that here. In the US, butter must contain 80% minimum butterfat by law, while in France, butter must be composed of at least 82% fat. Home churned butter will be right up there in the 86% range. Commercial butter is a very uniform dispersion of water in oil. The 80% target fat level and continuous churn processing require such a product. In the US, butter must contain 80% minimum butterfat by law, while in France, butter must be composed of at least 82% fat. Home churned butter will be right up there in the 86% range. Commercial butter is a very uniform dispersion of water in oil. The 80% target fat level and continuous churn processing require such a product.
Batch-churning cream into butter takes about 30 minutes, but it is only in the last few minutes that the butter begins to form. In Brief, the mechanical agitation of the churning process breaks down an emulsifying membrane around droplets of butterfat, allowing the butterfat to solidify as butter.
Butter from the Farm
Up until the early to mid 1900’s, most farm wives were expert butter makers. Butter sales were very local and produced on family farms and in small creameries.
 This butter was usually made in small batches. In those days butter customers were connoisseurs in a way that we are not today. For example, the early spring butter brought a much higher price than any other. This butter was usually made in small batches. In those days butter customers were connoisseurs in a way that we are not today. For example, the early spring butter brought a much higher price than any other.
Traditionally, butter making began with the separation of cream from milk by gravity. Just after milking, the milk was allowed to sit in pans or cans until the cream, being lighter, floated to the top of the milk. The cream was skimmed off and stored in a cool place for a few days. When several days’ cream had accumulated, it was churned into butter.
This small scale butter making took time and energy, but only needed simple equipment. Low-tech methods were still well-known in rural parts of the USA in the mid-20th century. In the UK it became less common for ordinary families to make their own butter in the course of the 19th century, but the old ways were still used on small farms and in the dairies belonging to grand houses.
In the few hundred years prior to the industrialization of butter making, cream was always cultured before it was churned. Culturing was the result of their practice of keeping several milkings before churning. There was no refrigeration, so the cream was stored in a cool room and the natural bacteria from the milk worked to culture it.
After the cows were milked, the milk was left to settle in a cool place, in shallow pans so the cream would rise to the top. Brass and earthenware dishes were used in the UK in the 17th and 18th centuries, with earthenware becoming gradually more popular. It was found that the earthenware could hold the proper bacteria from day to day.
After half a day or so, the cream was skimmed off and placed in the churn. Small home producers would usually collect a few days of milking to have enough cream for churning, and the natural fermentation would “ripen” the flavor. The cream would, of course, ripen much quicker during the warm months.
Industrial Butter Making
Modern dairy practices ignore seasonal differences by feeding cows an unnatural diet of year-round grain. If you often make butter from good cream, you will begin to notice changes as the seasons progress.r
Cream is removed from pasteurized whole milk in continuous centrifugal separators spinning at 30,000 RPM. The resulting cream contains 40% butterfat, and is known as heavy, or whipping cream. From the separator, the heavy cream travel  s directly into continuous ribbon churns, which process it into sweet cream butter and hig s directly into continuous ribbon churns, which process it into sweet cream butter and hig h-fat buttermilk. The buttermilk is high fat because ribbon churns are not very efficient at churning all of the butterfat into butter. This buttermilk is then re-separated to remove the excess butterfat, and dried for industrial applications such as commercial ice cream and baking products, as well as consumer packaged goods like buttermilk pancake and baking mixes. The butter made this way is called sweet cream butter because the cream it was made from was not cultured or acidified. h-fat buttermilk. The buttermilk is high fat because ribbon churns are not very efficient at churning all of the butterfat into butter. This buttermilk is then re-separated to remove the excess butterfat, and dried for industrial applications such as commercial ice cream and baking products, as well as consumer packaged goods like buttermilk pancake and baking mixes. The butter made this way is called sweet cream butter because the cream it was made from was not cultured or acidified.Types of Butter:Sweet Cream Butter:
This is a sweet cream, churned from fresh cream, with a mild, creamy flavor . It is most commonly produced by large commercial operations.
Cultured Butter:
This is a ripened or lactic butter made from soured cream. This should have a fuller and slightly nutty flavor from the natural fermentation.
In past times these cultures were found naturally in the dairies but today we can add these cultures to better control the process.
The cream is cultured before churning for two very specific reasons.
In addition to these practical benefits, culturing the cream before churning gives the butter a unique flavor – one that is very different from the flavor of today’s supermarket butter. Before the advent of the large commercial dairies, Minnesota and Wisconsin used to be dotted with small creameries, each with its own particular flavor of butter made from closely guarded family cultures.
These cultures ended up in the churned buttermilk, as well. Although buttermilk initially resembles skim milk when it is removed from the butter churn, the continuing action of the live cultures creates the tart, thick beverage that we know as buttermilk. Before the days of refrigeration, the consistency of buttermilk would change with the seasons: thin and less tart during winter and thick and clabbered in the summertime.
Cultured butter is very popular in Europe but not so popular in the US. The culturing intensifies the butter flavor itself and also introduces a number of subtler underlying flavors that greatly enhance the overall butter experience. The action of the lactic bacteria also helps to break down some of the structure which keeps the fat globules apart. This increases the yield of butter over sweet cream and also makes the butter come much quicker when churning.
If you make your own homemade butter, you have complete control over the type of cultures used for ripening the cream and how long you let them work before churning.
Since water is cheaper than butterfat, most commercial butter is blended down to 80% post churning. Cultured small batch butter ends up at more like 86%. The higher fat butter is more plastic at low temperature, which makes it easier to use in pastry, and the higher fat content also helps to make pastry flakier and brings a more full flavor.
Goat and Ewes Milk Butter:
| |||||||
| |||||||


I love this ladies enthusiasm and humor even in her mistakes:
Farmhouse Cheddar:
I’ve started with 2 gallons of local whole milk. Pasteurized, but not ultra-pasteurized.
Farmhouse Cheddar:
I’ve started with 2 gallons of local whole milk. Pasteurized, but not ultra-pasteurized.
Right now I’m at the very beginning of the whole process – I’ve added my mesophilic starter and the milk is sitting at or close to 90F for 45 minutes.

I’m 9 minutes into that waiting period.
I figure I’ll update as I go along. Next up will be adding the rennet, which is diluted in cold water – 1/2 tsp rennet in 1/4 cup cold non-chlorinated water, in case you’re taking notes.

The starter phase is almost done. I just smelled the milk in the pot – it smells warm and sweet.
Okay, I added the rennet, which is done by pouring it through a slotted ladle and gently stirring so the rennet makes it all the way through the milk and to the bottom of the pot. Then you “top stir” by laying the slotted ladle kind of flat against the top of the milk and gently pressing up and down, no more than half an inch. I think this way of doing things is, in effect, rocking the rennet, like you might very gently rock a cradle – you don’t want to disturb what’s inside, but you want there to be motion. At least, that’s my take on it.
So right now, the pot of milk is sitting on my counter, covered and wrapped in a towel to maintain the temperature as much as possible.
After this step – which is, I think, the most nerve-wracking because WHAT IF IT DOESN’T COAGULATE???!!! – comes the slicing or cutting of the curds. The book calls for a curd knife, which looks exactly like one of the large metal spatulas that I use to ice cakes. So that’s what I’m using. I think I’ll be able to take pictures of that step.
LATER:
Okay. Hitting a snag. Milk with rennet sat for 45 minutes but has not achieved a “clean break” – the curd doesn’t hold together when I poke it with a finger or thermometer. I’m letting it sit another half an hour and trying to stay calm.
Okay, I’m calmer. Haven’t checked the curd again yet, but I did some reading online and it’s okay if the setting takes longer than that 45 minutes to an hour I had anticipated. So I’m still breathing.
ohpleaseohpleaseohpleaseohpleaseohpleaseohplease… five more minutes til I check again…
YAAAAAAAAAAAAAAAAAAAAAAAAAAAAYYYYYYYYYYYYYYYYYYYYYYY!!!!!!!!!!!!
Okay, here’s how it looks when you get a clean break. (Sorry – I didn’t take a picture when it wasn’t breaking cleanly for comparison – I was too panic-stricken. Hahaha. Not really. Much.)
Yes, my finger is clean. What you do is, you stick your clean finger about an inch into the curd at about a 45 degree angle…
And then you lift up with the tip of the finger, bringing it up through the curd…
And, ideally, the curd splits apart relatively neatly, like it’s doing in the picture below (hee hee hee!!!) Before this, when I’d checked it the first time, my finger came away thinly coated with creamy wet curd. Nothing clean about it. So I was VERY happy when I achieved the clean break you see below.

So what’s next?
Well, after I did my little happy dance, it was time to cut the curds.
I need practice with that. Basically, you take your curd knife and, holding it straight up and down and with the tip of the knife touching the bottom of the pot, you slice straight lines about half an inch apart, from one “end” of the pot to the other. For some ornery reason, I started in the middle.

Then, when you’re done slicing the curd in that direction, you turn the pot 90 degrees and slice half inch wide sections again, so it looks like a checkerboard.
All that is the relatively easy part.
Now at this point you’ve got half inch strips of curd – the tops are on the surface and they extend all the way to the bottom of the pot. Got that? Okay. Next, in order to make little curds, you angle your curd knife at 45 degrees or so, and slice – at an angle – through all the lines you’ve just created. So you’re re-slicing through everything, but on an angle.
I kept trying to do this but it felt like I was blindfolded the whole time, and I had no idea if I was cutting at the right angle most of the time. But I did it. I think. Pretty much.

Ideally, I shouldn’t have the smaller, thinner slivers of curd. But it was hard to see the lines some of the time. And it’s the first time I’ve ever done this. I think I’ll do better next time around.
After cutting them, you let them sit for five minutes, covered.
The reason you cut them is to create more surface area through which moisture can be released. If it’s one big curd, then the moisture (whey) is released slowly. If it’s a bunch of little curds, lots more moisture is released, and more quickly.
Now, once your curds have rested, it’s time to sloooooooooooowwwwwwwwwwwwly cook them until they reach 100 degrees F. Now, when you warmed them up and mixed in the starter and the rennet, the temp of the milk was about 90 degrees F, so getting back to 100 shouldn’t be much hassle, right?
Ha! Wrong. Remember I said sloooooooooooooowwwwwwwwwwwwly? That’s the kicker. You can’t heat your curds and whey up any faster than 2 degrees every five minutes. If you go faster, the outside of the curd dries out faster and traps moisture inside too early in the game. At this stage, you want the curds to be releasing moisture, not hanging on to it. So you can’t just set your pot on the stove and crank the flame.
To heat the pot slowly, I used the method recommended in the book (Home Cheese Making, by Ricki Carroll), which is to fill your sink with hot water and set your pot of curds in the water. I read (either in the book or online somewhere), that you want the temperature of the water to be about 10 degrees (or fewer, depending on who you read) above the temperature you’re shooting for. Or something like that. I don’t know – it was very complicated in my mind. I was worried I’d cook the cheese too fast and have to dump it all or suffer the shame of drippy cheddar or something.
But as it turned out, it really wasn’t that difficult or stressful. Just time-consuming. The pot of curds was around 87 degrees by this point. I ran water in the sink and got it to around 100 or so. Then I set the pot in the sink and held a thermometer in the curds for about 40 minutes all told. Well. Not constantly.

You’re also supposed to gently stir the curds around. This encourages them to give up whey and it also helps distribute the heat evenly throughout the pot. I used my curd knife (aka my spatula) to stir, since the spoon and the ladle I tried seemed (to me) to break curds in the process. I may have been imagining that, though.
So, anyway, my goal was two degrees every five minutes – or no faster. And, for the most part, I achieved that goal. At some point it looked like the temperature was going up too fast, so I took the pot out, set it on the counter, stirred to bring the temp down a bit, and then, when the temperature of the curds was stable, I put it back into the water and brought the curd temp up another slow couple of degrees. Sometimes I had to add more hot water to the sink.
It was a learning experience, and by the last few degrees, I felt like I knew what I was doing, which is a nice feeling to have, let me tell you.

Okay, now once you’ve reached 100, you let the curds rest again. After all, it’s hard work, shrinking and eliminating liquid like that.
While the curds took their break, I got my butter muslin (cheesecloth’s finer-woven cousin) and a colander so I could strain the curds.

I would have saved the whey, but I still have 2 quarts of goat’s milk whey in the fridge, and no extra space…so…down the drain it went. Next time, I’ll plan better.

Isn’t that cool????
They look like large cottage cheese curds. And they’re not squishy and delicate like they were when I first sliced them. Now they’re rather firm and hold their shape even when you squeeze them.
I lined the colander with the butter muslin and poured the curds and whey through. Here’s what I ended up with:

Is it silly to be this overjoyed about curds? I think not.
Next, I tied the corners of the muslin, ran a wooden spoon handle through the two knots, and suspended the bag of curds from the top of my cheese pot so it could drain for an hour.


An hour later, it was time to unwrap my curds!

I unwrapped it completely and set it in the bowl and just looked at it for a couple of minutes.

I really sort of wanted to leave it just like that for a while. It looked so cool.
But no, it was time for milling.
Milling is when you break up the strained curd into pieces – in this case they needed to be roughly the size of walnuts. You’re also supposed to do this pretty gently, so as not to squeeze moisture out of the curds at this point. That’s what I read, anyway. So I was careful in my milling.

Next, you directly salt the curds by sprinkling a tablespoon of salt over the curds in the bowl and gently mixing it in. I used Kosher salt, because I always have plenty of it around, but you can also buy cheese salt from cheesemaking supply companies.

I used my hands and carefully tossed the curds around a bit to distribute the salt. When I was done, I noticed a little more whey in the bottom of the bowl, which is completely normal.
Then, while I was reviewing the section on molding and pressing the cheese, I read that ideally the temperature of the curds needs to be 70 or lower, otherwise the curds will loose too much moisture when you start pressing them. So much depends on temperatures!!
Anyway, I wondered just what temperature my curds were, so I stuck a thermometer in one of my curdy walnuts, and I was mildly surprised at what I saw.
Since 82 was way too hot to start pressing, I opened the window, so the chilly after-dinner air would speed up the cooling process. Eventually I hit 70 and it was time to start molding the curds.
First, I lined my plastic cheese mold with butter muslin (didn’t have normal cheesecloth, but I believe you can use that at this point if you prefer) and set it on two sushi mats in a rimmed cookie sheet. The mats help raise the mold off the cookie sheet, so that as the cheese is pressed and the liquid seeps out, the curds are not sitting directly in the liquid. I hope that made sense – it’s getting late and I’m tired.
Next, I spooned the curds into the muslin-lined mold.

(By the way, I’m making Cheddar! Can you believe it? Me neither!)
Initially it looks like you’ve got too many curds for the size mold you’re using, but just press down on the curds with a spoon (or your very clean hands) to flatten it down to about the level of the rim of the mold.
Then you neatly fold the edges of the muslin (or cheesecloth) up over the top of the curds. You want to do this as tidily as possible so as not to form ridges in your cheese.
Next, you need to place a flat round something on top of the wrapped curds. This is called a follower (I think. I’m sleepy.) because it basically follows the curds down during the pressing. (Or at least that’s my take on things.)
You can use a small plate, or a piece of untreated wood cut to fit, or…in my case…the food grade plastic takeout lid from last night’s Wings with Sticky Sauce that we ordered from the Chinese restaurant up the street. The wings are really good, and even better, the container they were in was perfect for my cheese pressing purposes.
I cut the flat part of the lid to use as a follower (it might just be called a “follow.” I’ll check on that tomorrow and let you know if I’m wrong.) and then I used the bottom of the container to hold my weights.
(Update, Sunday morning: It’s “follower.”)

But I am jumping ahead.
To press the cheese, you start with a moderate amount of pressure – ten pounds – for a relatively short period of time – fifteen minutes. I think this is because at this stage the curds are pretty loose, and you’re just getting them mushed and squished into place and releasing the major liquid.
I don’t have a cheese press, though part of me wants to order the blueprints and make one, but we do have weights. Nice flat, round little weights that I removed from the dumbells in the basement and brought up to the kitchen. They’re the perfect size for pressing cheese.
I got four 2 1/2 lb weights to start with and carefully set them in the base of the takeout container on top of the follower on top of the wrapped curds in the mold. Like so:

Almost immediately the curds started to release more whey.
Fifteen minutes later it was time to remove the first set of weights, take the cheese out of the mold, flip it over, and increase the weight.
Here’s the cheese after I took it out of the mold. It’s still wrapped, of course.

And then, a quick flip and back into the mold it goes.

I’d also drained the whey from the cookie sheet and rinsed off the two sushi mats, by the way.
At this point, I pressed the cheese down into the mold and moved the whole thing into the pantry.
So here, for tonight, is the cheese pressing set-up:
That’s twenty pounds of weight on top. I have to leave it like this for 12 hours, then take the cheese out again, flip it over, and put the weights back on it for another 12 hours.
And there’s more to come after that, but I’ll stop now and post this, and then post short updates as the cheese moves into the drying and aging phases.
But for now – I’ve started my first batch of Cheddar. Yay!

II. WAXING AND DRYING
I had the cheese in my pantry drying on a sushi mat on top of a wooden (untreated) board for a week. The instructions I’ve read say 3-5 days depending on air temperature and humidity, but I ended up going a bit longer because I found a bit of mold on one side and after getting rid of that (by prying it off with a knife, which is really NOT the correct method, I learned afterward) I needed to give the cheese a bit longer to re-form the rind. (Correct method is to dip a clean cloth in some vinegar and gently wipe the mold away.)
So, first, after the cheese sat under the final weight for a total of 24 hours. After that point, it was time to unwrap the cheese.
So here it is, after the weight has been removed and I’ve taken the wrapped cheese out of the plastic mold:

Then I very carefully peeled away the cheesecloth.
And then I set it down so I could admire my work and take pictures.
And then I critiqued it a bit…for instance, see the cracks down along the lower part in this next picture?
Not sure if that’s going to present a problem later or not. In one recipe I read, the final pressing weight was 20 lbs, but it was 50 in another version of the recipe. I went with 20 because it was, frankly, easier, but now I’m wondering if that might allow moisture to turn into mold or something during the aging phase. I guess we’ll find out around the end of June or so, won’t we?

Anyway, once the cheese was unwrapped, I just set it on a clean, dry mat on top of a piece of wood and put it all back in the pantry to dry.
And I turned it and repositioned it on the mat and the cutting board several times a day, to help the rind develop evenly and to prevent mold from forming.
As I mentioned above, despite my best intentions, a bit of mold did form, but from what I read that’s very normal and easily remedied.

So that was that – periodically turn and move the cheese until it had a nice rind. Not a hard rind – we’re not talking parmesan here. It was a darker, yellower shade than the wet cheese that came out of the cheesecloth, and it felt dry to the touch.
So, before actually waxing the cheese, it’s a good idea to put the cheese in the fridge for a few hours so it’s easier to wax.
Why would that make it easier? Well, because you’re applying heat in the form of very hot wax to this room temperature food item, and the hot wax MIGHT just make the rind soften or melt. But if the cheese is cold, it’s less likely to soften when the wax is applied. And, of course, the wax needs to be applied quickly.
So I put the cheese in the fridge for a few hours and did other stuff for a while.
And when the cheese came out, I wiped it down (as directed) with a damp cloth dipped in vinegar, to get rid of any lingering bacteria that might try to colonize under the wax. I let it sit on the counter to dry while I started melting the wax.

Here’s the cheese wax in my makeshift double boiler. Wax is flammable and cannot be left unattended while it’s melting and over heat, whether it’s an open flame or not. It’s just too potentially dangerous. It’s also recommended that when you’re melting it, you do so with the hooded vent above your stove running, to pull off the heat and vapors that might decide to go rogue and burst into flame.
Yeah, I was a bit uncomfortable about waxing. But as long as you don’t leave it alone, you should be fine.

At last, the wax begins to melt, and the block slips down and lies flat on the bottom of what will now be forever the cheese wax vessel.

Here, off to the side, is a sheet of foil, another sushi mat, and a natural bristle brush. Why? The brush was to paint the wax onto the cheese. I know, I could have dipped it, and I’d originally planned to, but then I changed my mind. The melted wax was going to be very shallow and rather than being able to dip half the cheese wheel at a time, I’d have to keep dipping and rotating the cheese wheel and I’d probably end up having to paint the center portion on each flat side anyway. So I used the brush.
The foil was so I could put the brush down without getting wax on anything else. And the mat? It served no purpose at all. I had it out because later that night I was going to be unwrapping and air drying the Stirred-curd Cheddar. But it served no purpose with the waxing. Consider it a garnish.

And here’s the cheese again, waiting patiently nearby.

I have no pictures of the actual dipping. I’m sorry. But I kind of needed two hands – one to hold the cheese and one to paint the wax on.
It took a few coats. And it was really very warm in my kitchen (80s) so I’d paint on some wax, very quickly (the wax dries fast so you have to paint fast), and then pop it in the fridge to chill down again for a couple of minutes, then back out and wax the unwaxed portion, chill again, then put on another coat in the same stop-start fashion.
And, finally, once the cheese had at least 2, but maybe it was 3 layers of wax applied and dried, I attached a little label so that eventually, when I’ve got a bunch of red wheels of cheese aging, I’ll know which is which.
It ain’t pretty, and maybe I’ll try dipping the next one, because that might look nicer…but here it is.
My waxed wheel of Farmhouse Cheddar. Ready to age.
Currently it’s in the basement, in the closet where we store such things as Christmas, Easter, Halloween and Thanksgiving decorations, wine, and other miscellaneous stuff. It’s nice and cool down there, but won’t be humid enough for long, so I’ll be cleaning out our chest freezer (which Bill uses to lager beer sometimes) and setting the temperature to 55 degrees F, and that will be my “cave” for the cheeses. At least until Bill decides to make another lager, which he says he has no plans to do any time soon. I’ll keep it humid during the summer with a little dish of water in the bottom of the fridge, and hopefully that will serve me and my cheeses well. One way or the other, I’ll let you know.
If It Looks Like Cheddar…
YAAAAAAAAAAAAAAYYYYY!

III. TASTING
Ahem.
So, I knew I could sample the Farmhouse Cheddar as early as a month after waxing.
Originally I was going to try to hold off for two months, but…I was just so curious. A mix of curious and worried that maybe I’d somehow messed something up and it would be spoiled.
I just had to know.
So earlier in the week I decided that we’d sample the Farmhouse on Friday.
Then I sort of forgot about it because I got 2 gallons of goat milk at the Farmers’ Market yesterday and got distracted by thoughts of Chevre. Mmmmmmmm…Chevre….
So when Bill said something like “Are you still doing the cheese tonight?” I thought he meant was I going to make the Chevre…and then I remembered.
The Cheddar!
So I got it out of my temperature-regulated chest freezer “cave” and brought it out to the deck on a plate with a knife and some crackers.
And with little fanfare (just some pictures), I picked off the label and cut the wheel in half.

And pulled the halves apart.

AND THERE WAS NO SLIME OR MOLD OR ANYTHING BAD!

Sorry, I’m still a bit dazzled by it all.
I cut one half in two and peeled the wax off, and took pictures (while Bill fidgeted impatiently nearby) and finally, finally, we sampled a slice.
And…
…it tasted…
…like…
…mild cheddar cheese.
Holy dairy cow, Batman!
I did it!!!!!!

Here is a good link for making Goat Milk Butter: http://phys.org/news/2013-11-albany-scientists-sheep-vaccine.html
Article for Dry Mozzerella cheese: http://cheesemakinghelp.blogspot.com/2013/11/making-dry-mozzarella-in-pakistan.html?utm_source=feedburner&utm_medium=email&utm_campaign=Feed%3A+CheesemakingHelpNewsAndInformation+%28Cheesemaking+Help%2C+News+and+Information%29&utm_content=Yahoo!+Mail
Oh! How could I forget my favorite, Ice Cream. I SCREAM YOU SCREAM WE ALL SCREAM FOR ICE CREAM!!


I will be sharing more recipes as I venture into this lovely art of using milk to make wonderful products.
Here are some more links to find recipes and books.
Caprine Supply http://www.caprinesupply.com
Hoegger Supply Company http://www.hoeggergoatsupply.com
The American Cheese Society http://www.cheesesociety.org
New England Cheesemaking Supply Co http://www.cheesemaking.com
Happy Cheesemaking.
No comments:
Post a Comment